Actions Spectator

Spectator
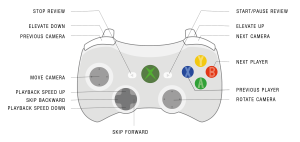
Both the During Action View and the After Action Review can be viewed on the spectator. The spectator can be operated via a touchscreen. The camera can be operated using a controller:
The After Action Review cannot be started at the same time as the During Action Review. After stopping a scenario, the After Action Review can be started.
- During Action View (DAV)
- After Action Review (AAR)
While running a scenario, the instructor can watch the spectator. Press the spectator on the top left on Live to watch the current scenario.
Screen
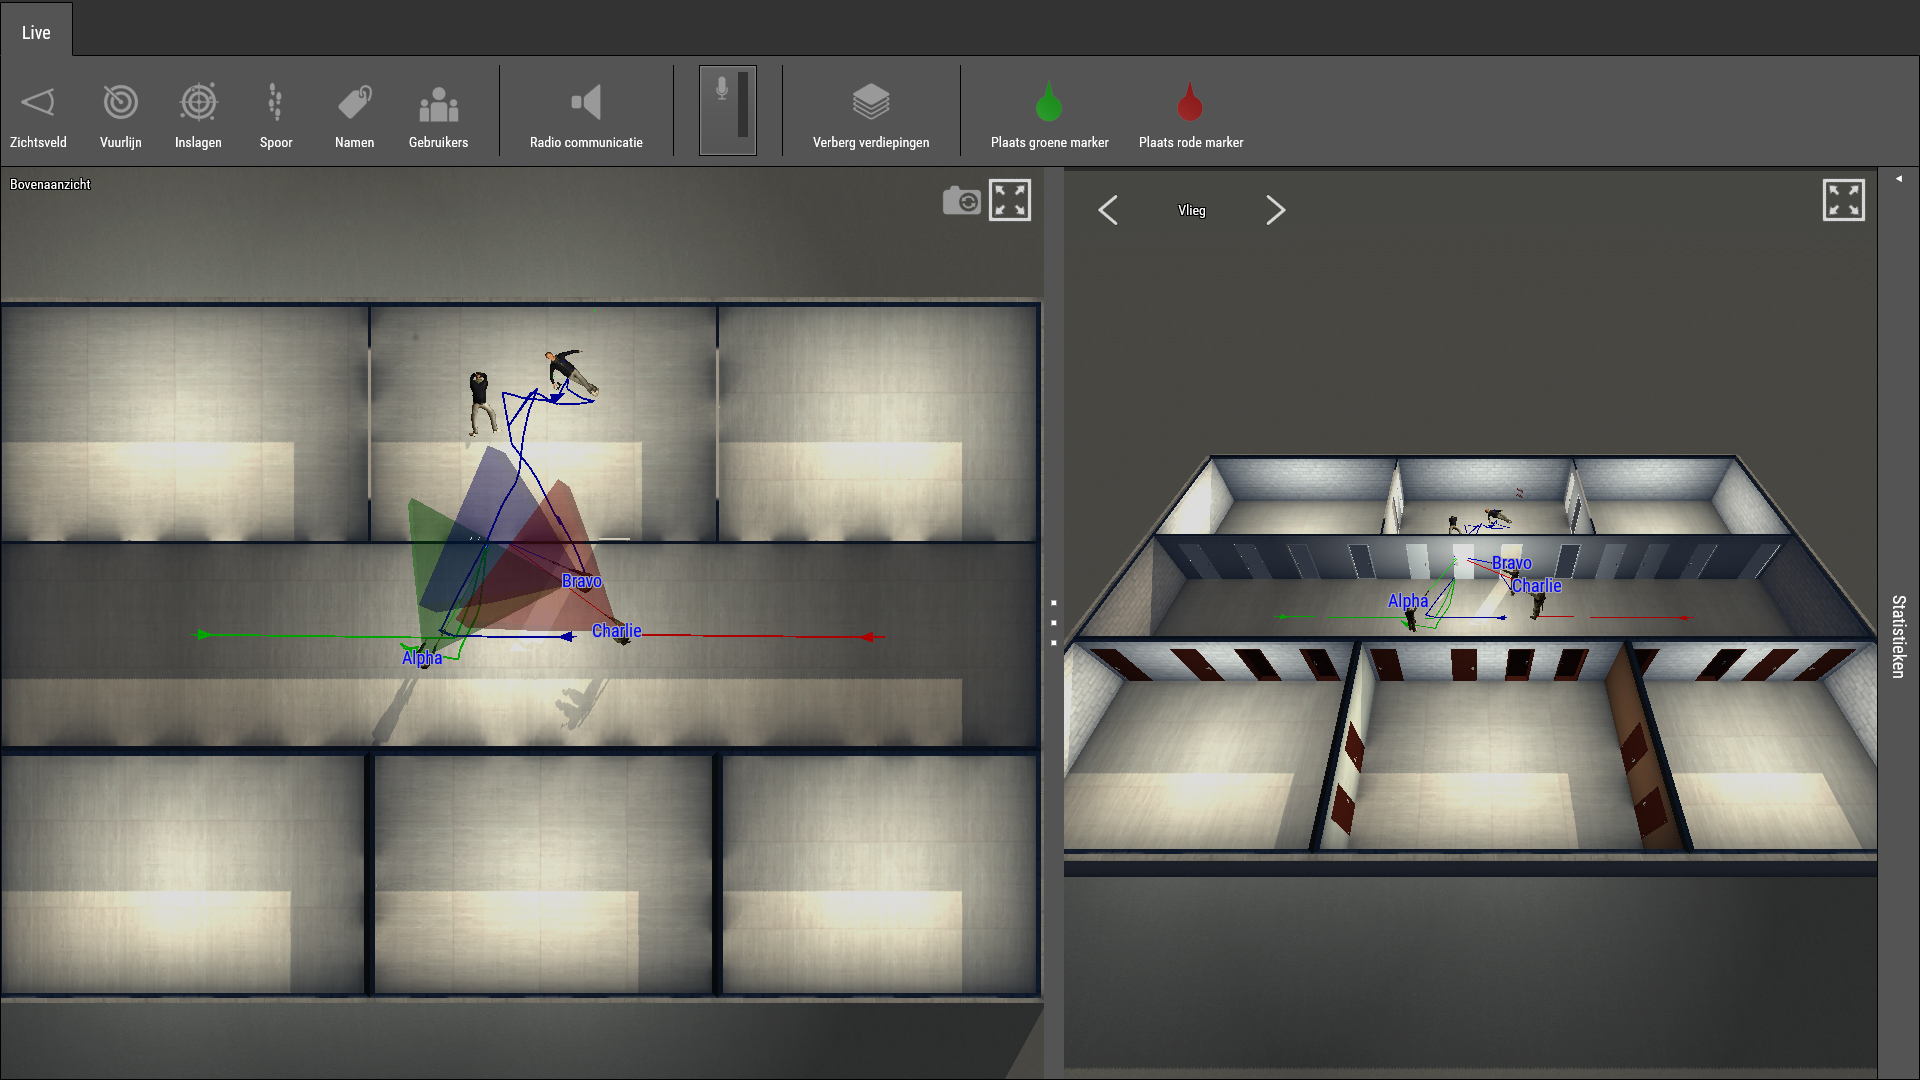
The screen is divided into two parts. The top view is shown on the left. All players can be seen here. The image from the selected camera is displayed on the right. With the slider in the middle, the distribution of both screens can be determined.
Action
Description

Scroll bar
With the slider in the middle, the distribution of both screens can be determined.

Full screen
Set the screen to full screen size.

Minimize screen
Resize the screen so that the top view and camera view can be side by side.

Restore top view
Restore the top view so that the entire building and all players are visible again.
Camera positions
Camera position
Description
Free
Eye
Shoulder
Orbit
Gear
Eye (NPC)
Shoulder (NPC)
Camera
The camera can fly around freely.
The camera shows what the selected participant sees.
The camera looks over the shoulder of the selected participant.
The camera flies around with the selected participant as the center.
The camera overlooks the course of the selected participant’s replica.
The camera shows what the selected NPC sees.
The camera looks over the shoulder of the selected NPC.
?
View options
At the top left you can determine which elements are displayed in the top view and camera view.
Action
Description

Field of view
Show the participants’ field of view in the top view, depicted as a colored cone.
Field of view (NPC)
Show the NPC’ field of view in the top view, depicted as a colored cone.

Tracks
Show the path the players have walked, depicted as a line with arrows indicating the direction.

Call signs
Show the names of the players, pictured above their heads.

Users
Opens a menu where participants can be selected to follow. The other participants remain visible, but no information is displayed.
Radio communications
Action
Description

Radio communication
Indicate which communication should be heard. Per radio channel you can see how many players are on that channel:
All
Broadcast
Channel 1 (if in use)
Channel 2 (if in use)
Channel 3 (if in use)
Channel 4 (if in use)
Channel 5 (if in use)
Channel 6 (if in use)
All communication
Push-to-talk button
Action
Description

Push-to-talk button
Click on the push-to-talk button to communicate about the chosen communication channel.
Hide floors
Action
Description

Floors
When Automatic adjustment is disabled, a floor can be selected that should be visible by clicking on a floor in the menu.

Auto Adjust
By checking this option, the floor where the players are currently located is automatically displayed. If this is not checked, you can choose which floor is visible.
Place markers
Action
Description

Place green marker
Adds a green marker to the scenario. This green marker will be displayed on the timeline during the AAR so that the instructor can easily locate and evaluate this point during the evaluation.

Place red marker
Adds a red marker to the scenario. This red marker will be displayed on the timeline during the AAR so that the instructor can easily locate and evaluate this point during the evaluation.
Statistics
The statistics tab shows the statistics per player and for the entire team.
Press Review last on the Spectator to review the last played scenario. Or press Review to choose a scenario from the list of executed scenarios. Select a scenario and click review selected to evaluate the selected scenario.
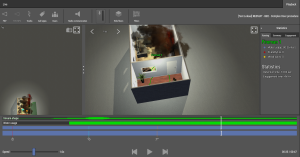
Important events like the openings of doors, shots fired, thumb checks and grenades will show up as event icon in the top-down view during playback of the AAR.
Screen
The screen is divided into two parts. The top view is shown on the left. All participants can be seen here. The image from the selected camera is displayed on the right. With the slider in the middle, the distribution of both screens can be determined.
Action
Description
Scroll bar
With the slider in the middle, the distribution of both screens can be determined.
Full screen
Set the screen to full screen size.
Minimize screen
Resize the screen so that the top view and camera view can be side by side.
Restore top view
Restore the top view so that the entire building and all players are visible again.
Camera positions
Camera position
Description
Free
Eye
Shoulder
Orbit
Gear
Eye (NPC)
Shoulder (NPC)
Camera
The camera can fly around freely.
The camera shows what the selected participant sees.
The camera looks over the shoulder of the selected participant.
The camera flies around with the selected participant as the center.
The camera overlooks the course of the selected participant’s replica.
The camera shows what the selected NPC sees.
The camera looks over the shoulder of the selected NPC.
?
View options
At the top left you can determine which elements are displayed in the top view and camera view.
Action
Description
Field of view
Show the participants’ field of view in the top view, depicted as a colored cone.
Field of view (NPC)
Show the NPC’ field of view in the top view, depicted as a colored cone.
Tracks
Show the path the players have walked, depicted as a line with arrows indicating the direction.
Call signs
Show the names of the players, pictured above their heads.
Users
Opens a menu where participants can be selected to follow. The other participants remain visible, but no information is displayed.
Radio communications
Action
Description
Radio communication
Indicate which communication should be heard. Per radio channel you can see how many players are on that channel:
All
Broadcast
Channel 1 (if in use)
Channel 2 (if in use)
Channel 3 (if in use)
Channel 4 (if in use)
Channel 5 (if in use)
Channel 6 (if in use)
All communication
Push-to-talk button
Action
Description
Push-to-talk button
Click on the push-to-talk button to communicate about the chosen communication channel.
Hide floors
Action
Description
Floors
When Automatic adjustment is disabled, a floor can be selected that should be visible by clicking on a floor in the menu.
Auto Adjust
By checking this option, the floor where the players are currently located is automatically displayed. If this is not checked, you can choose which floor is visible.
Filters
Under filters are events that can occur during the scenario. By check-marking a filter, a marker is displayed on the timeline at the moment when such an event occurred.
Action
Description

Door open
The moment a door opens.

Door closed
The moment a door closed.

Door breached
The moment a door is breached.

Thumb check
The moment of the thumb check.

Crucifix
The moment of the crucifix.

Hit
The moment of the bullet impact.

Weapon jam
The moment of a weapon jam.

Mobility kill
The moment of a mobility kill.

Neutralised
The moment of a kill.

Grenade
The moment of a grenade explosion.

Flashbang
The moment of a flashbang explosion.
Red marker
Red marker.
Green marker
Green marker.

Verbal engagement
The moment of a verbal engagement.

Shots danger close
The moment of a shots danger close.

Team flagged
The moment of teammember being flagged.
Timeline
Two blue timelines are displayed at the bottom of the screen.
Timeline
Description
Narrow Timeline
The smaller timeline indicates which moment in the screenplay is displayed.
Broad timeline
The broad timeline uses markers to indicate which events occurred at which point in the scenario. The different events can be displayed or obscured on the timeline using the filters menu.
Playback speed
With the slider at the bottom left you can indicate how fast the scenario should be played.
Moment in the scenario
The times at the bottom right indicate the moment in the scenario and the total length of the scenario.
Statistics
In the tab Statistics, the statistics of the participants currently in the scenario will be displayed. During the DAV the live water usage, friendly fire and weak spots statistics are shown. During AAR the Detection time (the moment the fire is first detected) and the Engagement time (the time it takes before first seeing the fire and extinguishing the fire) are shown.