Manual Operator
This manual is intended for the person responsible for operating the system. The operator sits behind the EXCON and guides the participants during the training. The starting point of this manual is that the system has been built by the technician, according to the instructions described in the technician’s manual. The following topics are described in this guide:
Powering on the system
Instructions for powering on the system before training.
System check
Instructions for checking the system prior to training so that everything is working properly during training.
Training preparation
Instructions for entering the participants details and preparing the scenario playlist.
Physical gear preparation
Instructions for donning the Smartvest and calibrating the Smartvests/replicas.
Virtual gear preparation
Instructions for assigning virtual gear in SUIT.
Training in SUIT
Step-by-step plan to get acquainted with SUIT and a step-by-step plan to refresh the knowledge.
Instructions for guiding the training from the EXCON, setting up the instructor and changing batteries during the training.
After the training
Instructions for storing the gear props and taking off the Smartvests after training.
System shutdown
Instructions for shutting down the system.
Leaving system unattended
Instructions for shutting down and partially storing the system when left unattended for a while.
Maintenance
Description for maintaining the different parts of SUIT.
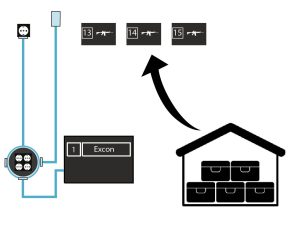
Powering on the system
If the system has been left unattended for a while before the start of the training, the system must be switched on again at the start of the training. When turning on the system, keep the following points in mind:
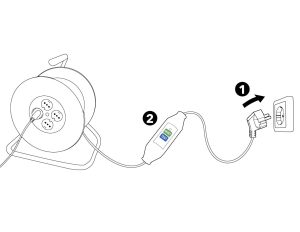
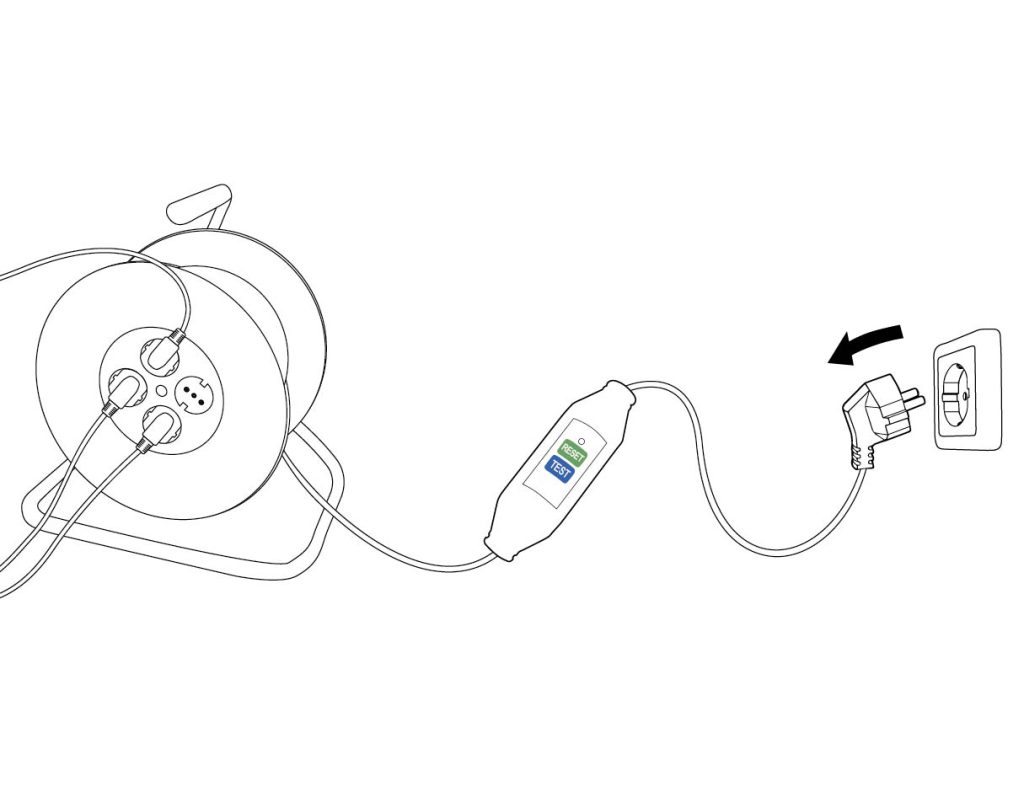
Cable reel with residual current circuit breaker
- Make sure that the cable reels are completely unwound.
- Only use the cable reels on grounded sockets.
- Connect the two cable reels each to their own grounded socket with power group. The cable reels may not be connected via each other – daisy chain.
- The cable reels are equipped with a ground fault circuit breaker “EPP Elimit” with a green RESET button and a blue TEST button. Whenever a reel is connected to the power grid, the following instructions must be followed (these instructions are also printed on the back of the RCCB):
How do you use the Elimit?
- Place the plug of your Elimit in a wall socket.
- Press the RESET button to activate your Elimit. The indicator changes from black (off) to red (on).
- Remove the plug from the wall socket. The Elimit turns off (the indicator changes to black).
- Repeat point 1 and 2.
- Press the TEST button. Your Elimit will turn off again (the indicator will change to black).
- Press the RESET button to reactivate your Elimit (red).
- Connect your appliance or power tool to your Elimit and you can get to work safely.
Cooling
Leave the replica cases open for cooling while the replicas are charging.
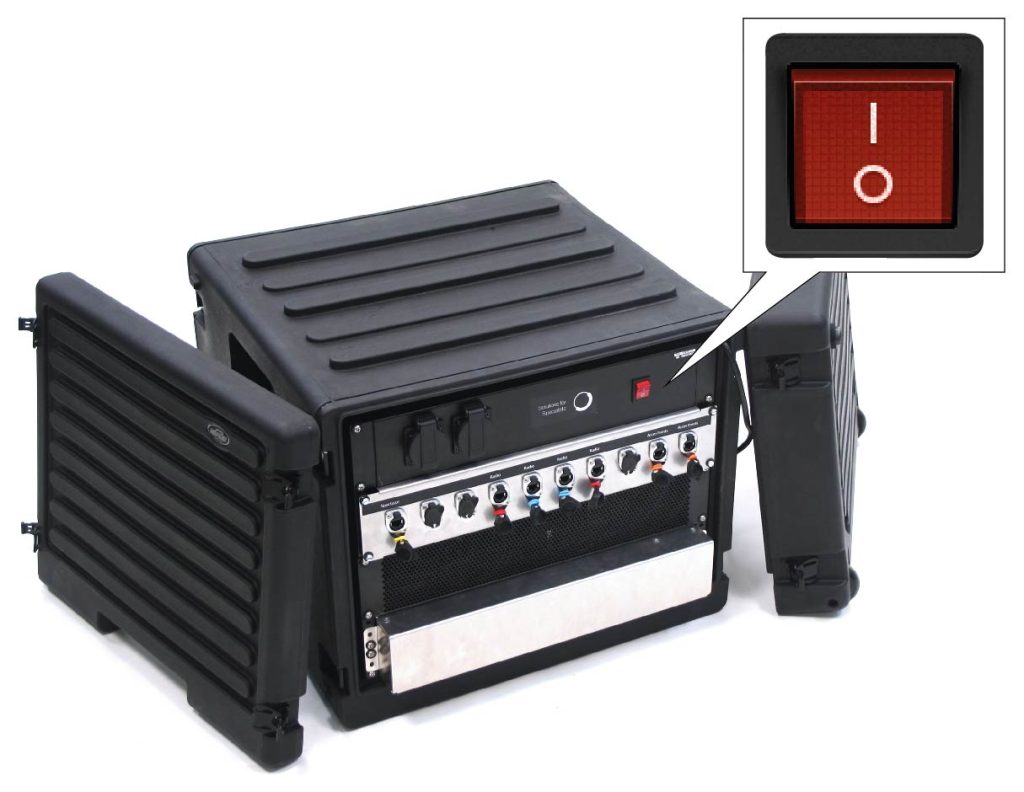
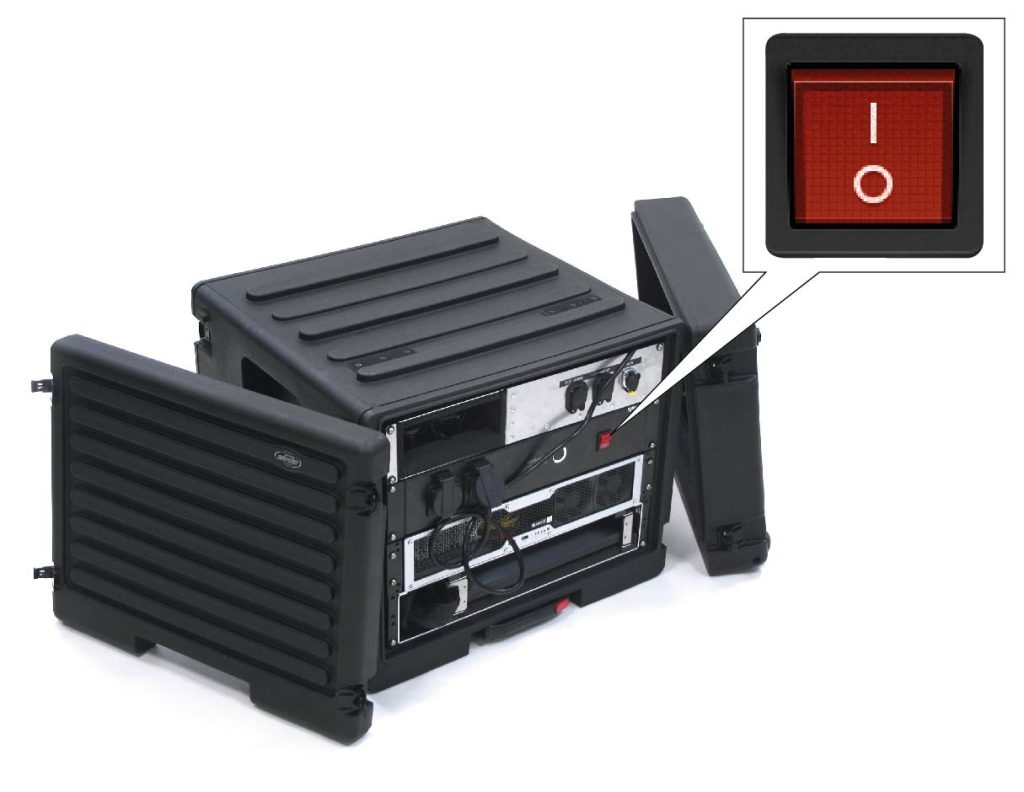
Starting up the EXCON
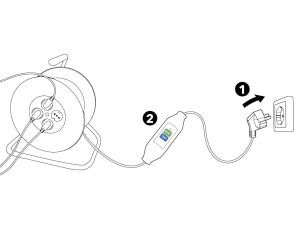
Insert the plug of the cable reel next to the EXCON into the socket (1) and follow the instructions on the back of the residual current circuit breaker (2).
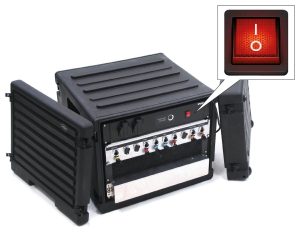
Press the red ON/OFF switch on the back of the EXCON on I.
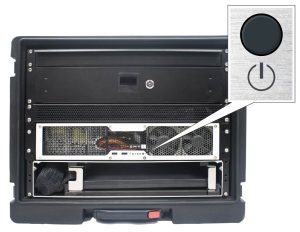
Press the ON/OFF button on the front of the EXCON to start up the computer and wait for it to boot up completely.
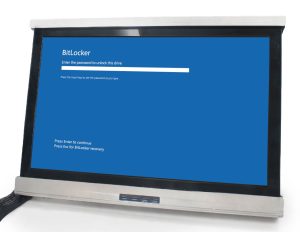
Enter the password on the computer to prevent the system from turning off again.
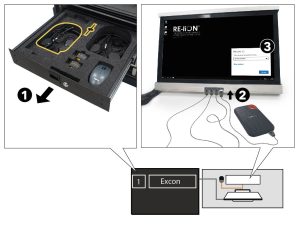
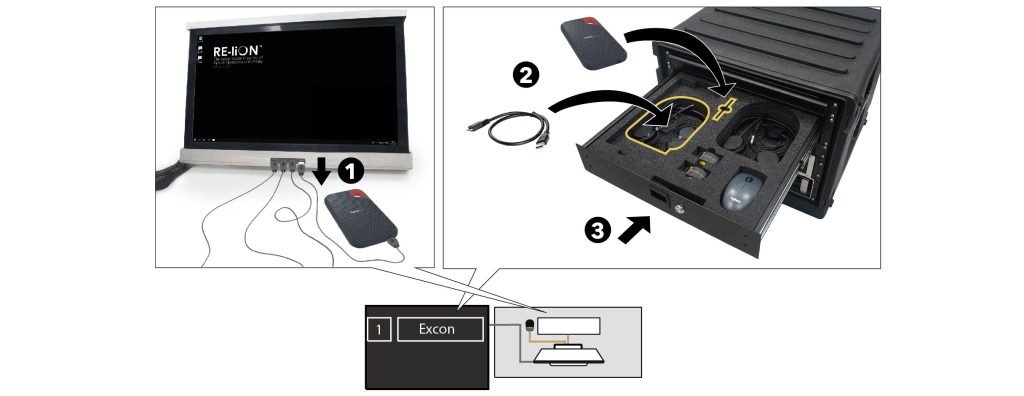
Take the external hard drive from the top drawer of the EXCON (1) – or from the safe place where it has been stored after the last training – and connect it to the USB port under the monitor (2) with the USB cable. Enter it password and click on Unlock to start SUIT (3).
Double click on the SUIT icon on the desktop to start SUIT.
Charging batteries and replicas
WARNING
Replicas and batteries should not be charged for a continuous period longer then 16 hours. Discontinue charging after this period at the latest, disconnect the replica boxes and battery charger from the electrical outlets. Adequate measures should be taken to ensure that the temperature – in the room where charging takes place – cannot rise over the specified operating limit.
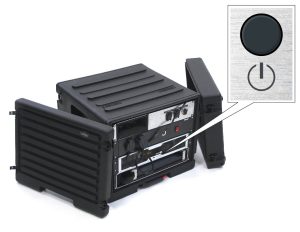
Plug the cable reel into the mains socket (1) next to the battery charger and follow the instructions on the back of the earth leakage circuit breaker (2).
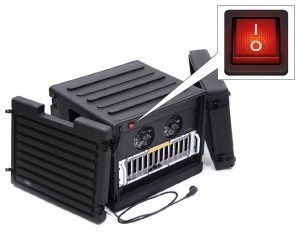
Press the red ON/OFF switch on the back of the battery charger to I.
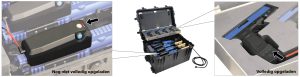
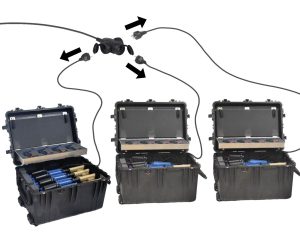
Plug the gear charging case into the cable reel. Connect the power cable to the physical gear props.
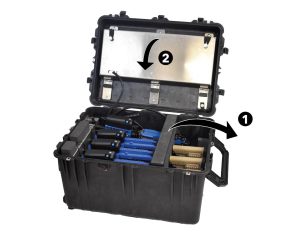
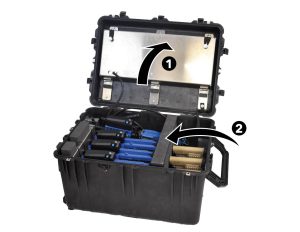
Open the replica case. First remove the insert from the box (1) and then open the steel drawer in the lid (2).

Connect the power cables coming out of the replica cases to the replica power cable.
PAY ATTENTION
Beware of tripping. Lay the cables together in orderly paths as much as possible and make sure that there are no loops or kinks in the cables. Tape the cables to the floor with duct tape if necessary.
Connect all replicas to the charging cables. The replicas are charging when the right LED of the three LED lights red.
PAY ATTENTION
When the charging light is no longer lit, the replica is fully charged.
Starting the Spectator

Press the red ON/OFF switch on the back of the Spectator to I.
Press the ON/OFF button on the back of the Spectator to start up the computer.

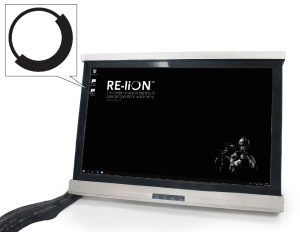
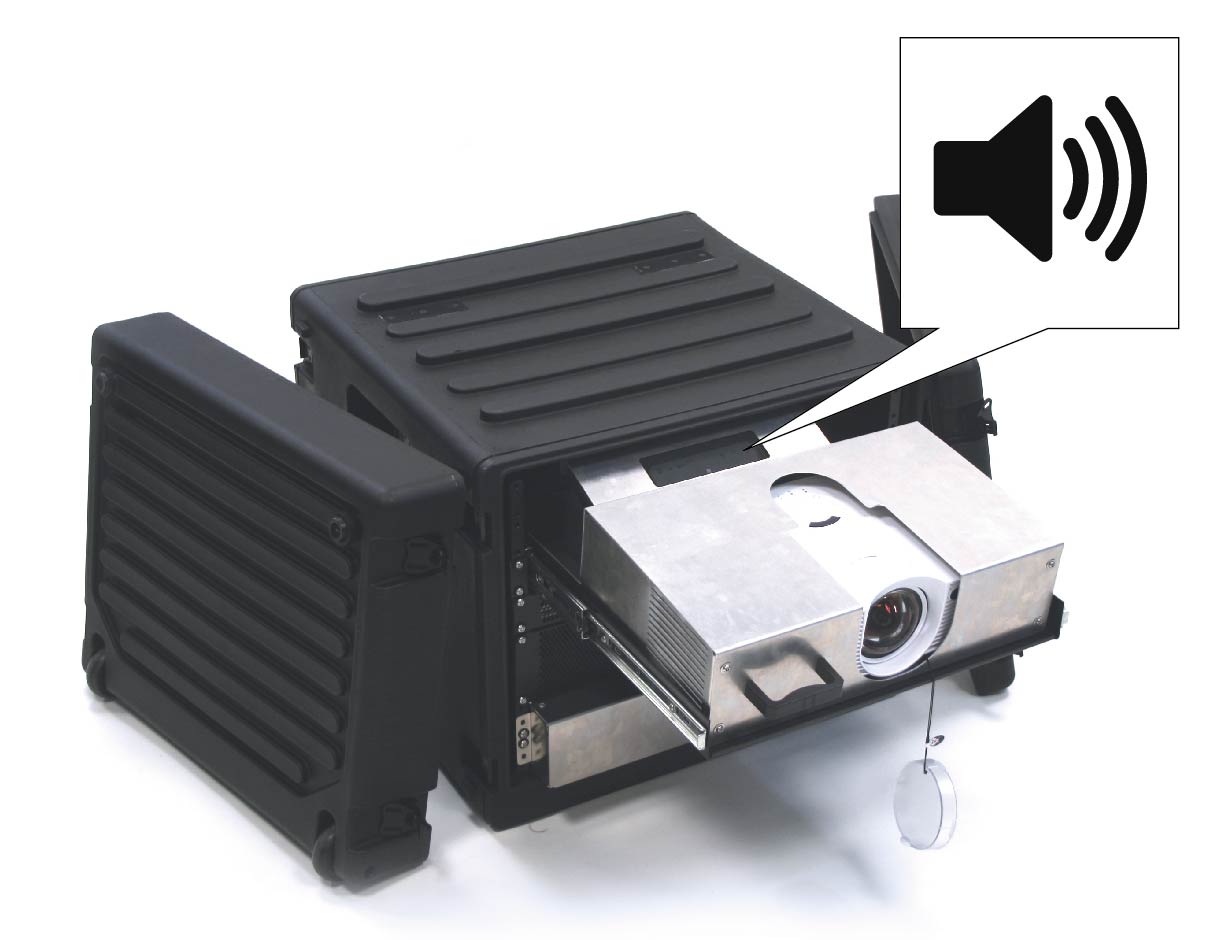
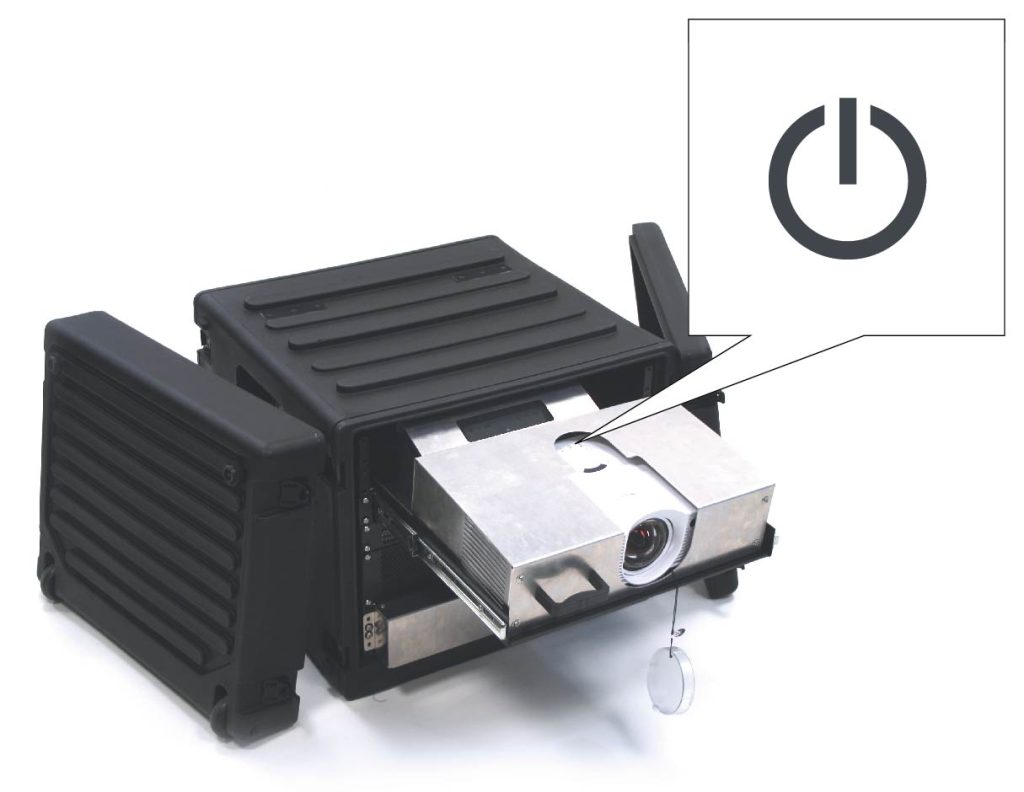
Press the ON/OFF button on the top of the projector to start up the projector.

Focus the image with the adjustment ring of the lens.
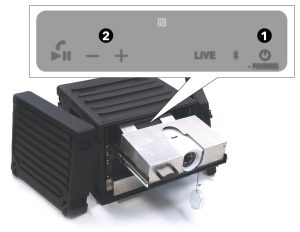
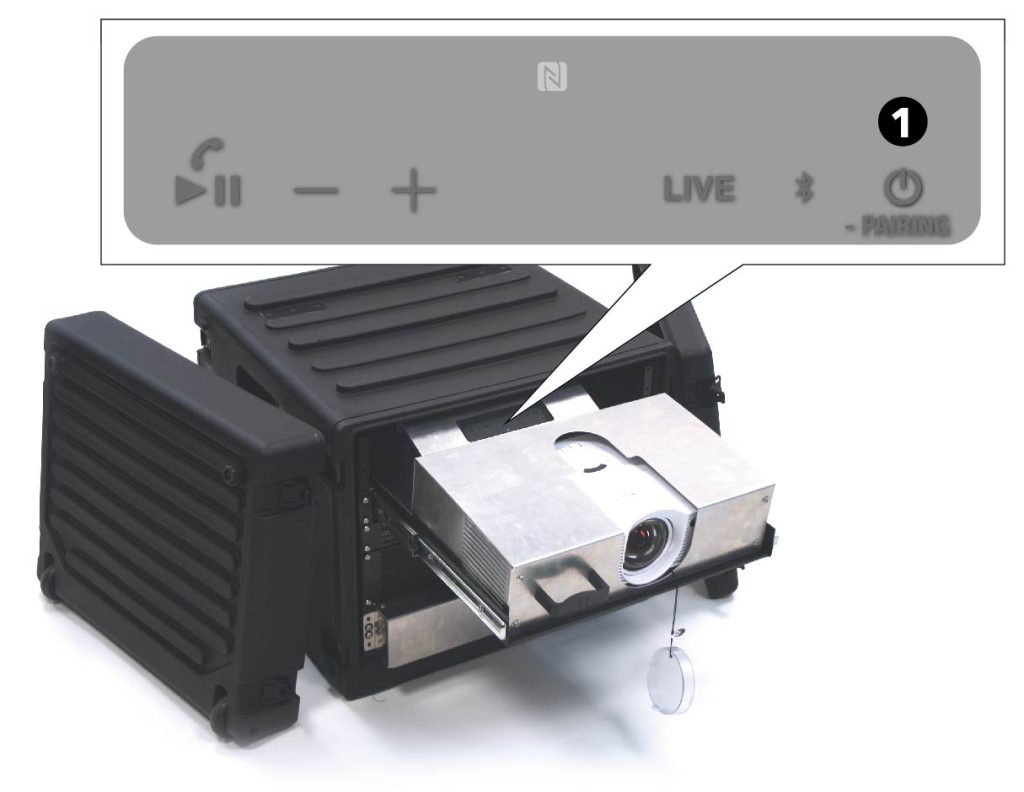
Press the ON/OFF button behind the projector to switch on the speakers (1) and adjust the volume of the sound with the + and – buttons (2).
System check
System check
The starting point of the system check is that the location scouting has been completed successfully and completely, according to the instructions described in location scouting.
The system check must be performed prior to each SUIT training day. The system check takes a maximum of 60 minutes. Before the system
check can be performed, the system must be set up and calibrated and the Smartvests must be hanging from the racks and switched on.
- Training field calibration
- Smartvests
- Replicas
- Positioning system
- Spectator
- Status bar EXCON
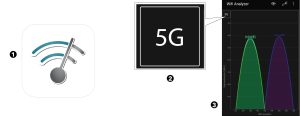
Check which channels are in use via Wifi Analyzer. To ensure that no interference occurs on SUIT’s WiFi network, there must be at least two unused, interference-free, non-overlapping and 40 Mhz wide radio channels in the 5Ghz WiFi band:
Download the Wifi Analyzer app on the smartphone from the Google Play Store and open the app (1). Tap once with your finger on the first screen so that the type of network appears in the top left of the screen. If it is set to 2.4G, tap it to set the network to 5G (2). Check that the
WiFi paths/channels of the suit WiFi do not cross each other and check that there are no other WiFi channels through the suit WiFi (3).
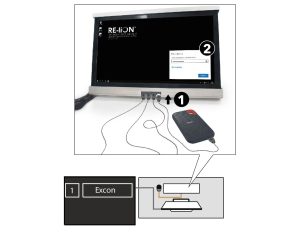
Make sure the external hard drive is connected to the correct port – a blue USB 3 port under the monitor (1). That way the software won’t stutter. When the external hard drive is reconnected, input the password to unlock the external hard drive before starting SUIT (2).

Double click on the SUIT icon on the EXCON to start SUIT.
Make sure all the HMDs receive the map scan from the Golden HMD via the VBC+ application.

Check the charge status of the batteries. The batteries are charged when the green LED light on the bottom right of the battery flashes. When the LED light stays on, the battery is fully charged. The display on the battery indicates the battery charge by cubes. At five cubes, the battery is full.
Slide the latch aside (1) to open the Smartvest’ battery compartment cover (2).
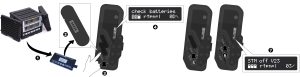
Place three fully charged batteries in the battery compartment: Remove a fully charged battery from the battery charger (1) and place it with the display facing out and the slot facing down (2) in the lower battery compartment. Press the battery so that it is held in place by a spring (3). The Smartvest’s display will now activate and show one full battery icon (4). Next, place a fully charged battery in the middle battery compartment (5) and the upper battery compartment (6) in the same way. The display will now show three full battery icons (7).
PAY ATTENTION
If the message check batteries is still displayed after inserting the three batteries, there may be the following:
The batteries are not in place correctly. Press the batteries firmly so that it is held in place by a spring.
The batteries are too low. Make sure there are three fully charged batteries in the Smartvest at the start of the workout.
The batteries are too different in capacity. Make sure three fully charged batteries are placed in the smartvest at the start of the workout.
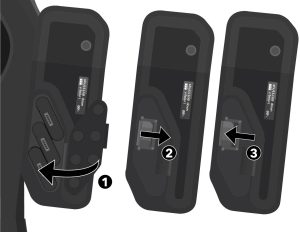
Close the battery compartment cover (1). Slide the latch aside to fully close the cover (2). Release the latch and make sure the tab of the latch falls into the slot (3).

Turn on the Smartvests. Hold down the Smartvest’s ON/OFF button until the display indicates initializing. Then the display indicates waiting for SUIT. The Smartvest is now ready for training.
PAY ATTENTION
If after turning on the Smartvest the message member open is shown on the display, make sure the battery compartment cover is closed properly. Slide the latch to the side to fully close the lid. Then release the latch and make sure the tab of the latch falls into the slot.

Check if the Smartvests connect to the access points: In SUIT, go to Start training (1) → 2. Physical equipment (2) → Smartvest tab (3) and check the list to see if all smartvests come online. If the status is Rotary knob they are fully online.

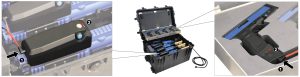
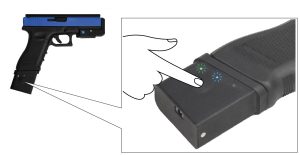
Check all smart vests to ensure both hand antennas are working properly: Take a Glock from the replica box and turn it on using the ON/OFF switch on the charging unit (1). Briefly hold the Glock near both hand antennas on all smart vests – indicated by a white-outlined square on the hand (2). When the blue LED light on the Glock flashes – and does not stay solid blue – it is connecting to the hand antennas in the smart vests (3).
Look through the lenses of the HMD to verify that the Smartvest setup and calibration home screen is displayed.
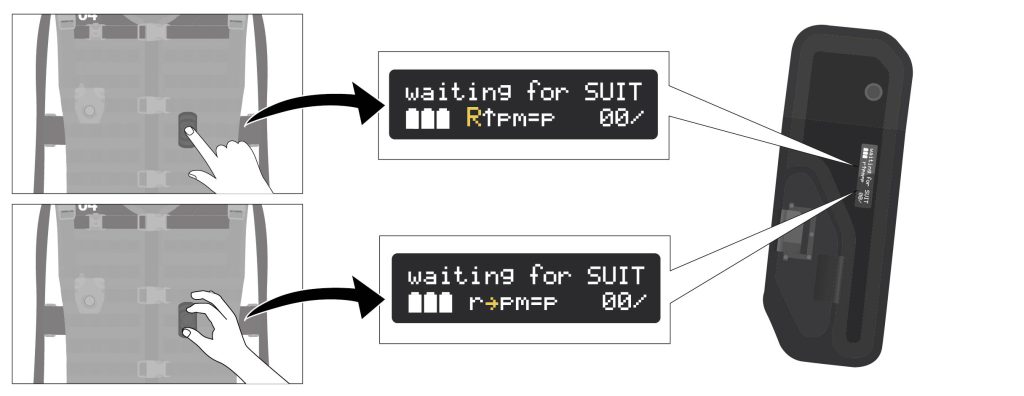
Verify that the rotary knobs of all Smartvests are working: Press the rotary knob and check on the display of the backpack box that the lowercase letter r changes to an uppercase letter R. Then turn the rotary knob and check on the display of the backpack box that the arrow turns.
Check the battery status of the replicas. The replicas are charging when the rightmost LED light of the three LED lights turns red. The LED light turns off when the replica is fully charged.
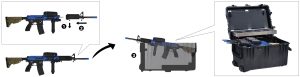
Add the barrels to the Colt-C7 replicas. Pull out the locking mechanism (1) and slide the barrel onto the replica (2). Then, place the replicas back into the case, ensuring the barrel rests on the edge of the case (3).
Check if all replicas are working properly:
First, turn on all Glock replicas using the ON/OFF switch on the charging unit (1). Check the operation of each Glock by holding them one by one near a hand antenna – indicated by a white-outlined square on the hand – of a smart vest (2). When the blue LED light on the Glock replica flashes – and does not stay solid blue – it is connecting to the hand antenna in the smart vest (3). Then, place the Glock replica back into the case.
Repeat the steps above for the Colt-C7 and Minimi replicas.
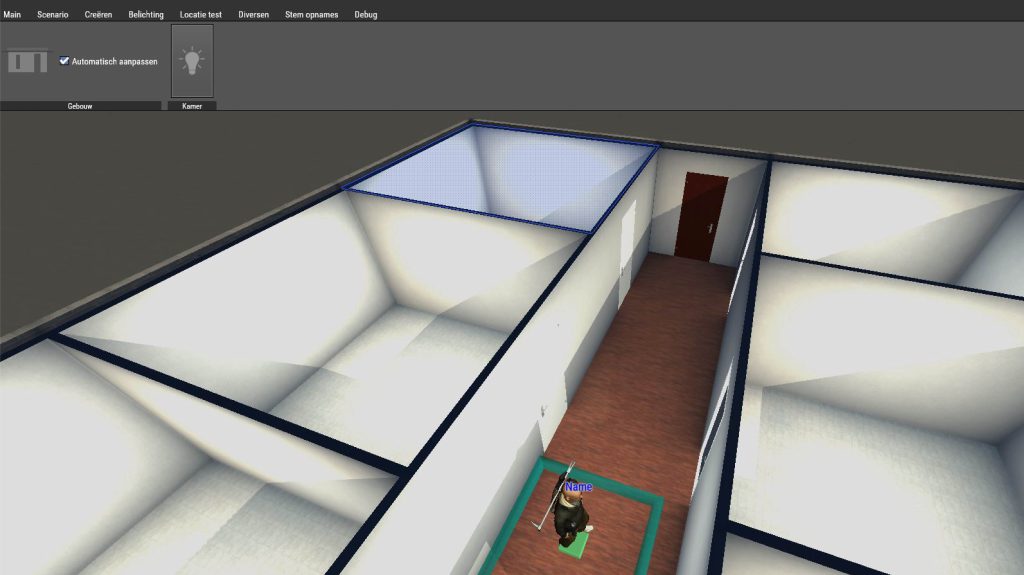
As long as nothing has moved from the day before, there is no need to scan another map of the player area. But if the banners need to move by the end of the day the map creation has to be repeated before the start of the next training.

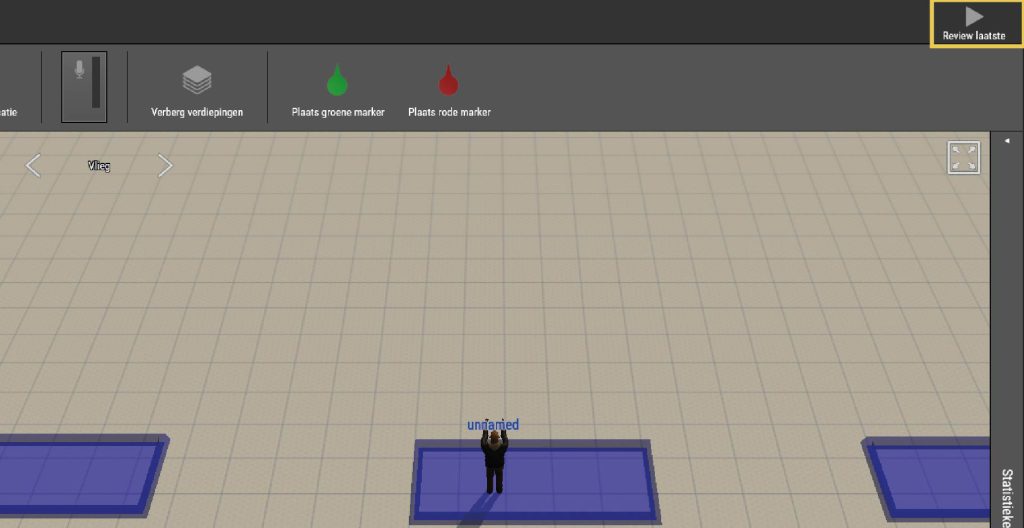
Verify that the Spectator’s headset is working. Instruct the person in Smartvest to come to the spectator to view the After Action Review (AAR).

On the Spectator at the top right of the screen, click Review last (1).
Verify that the sound from the speakers works.
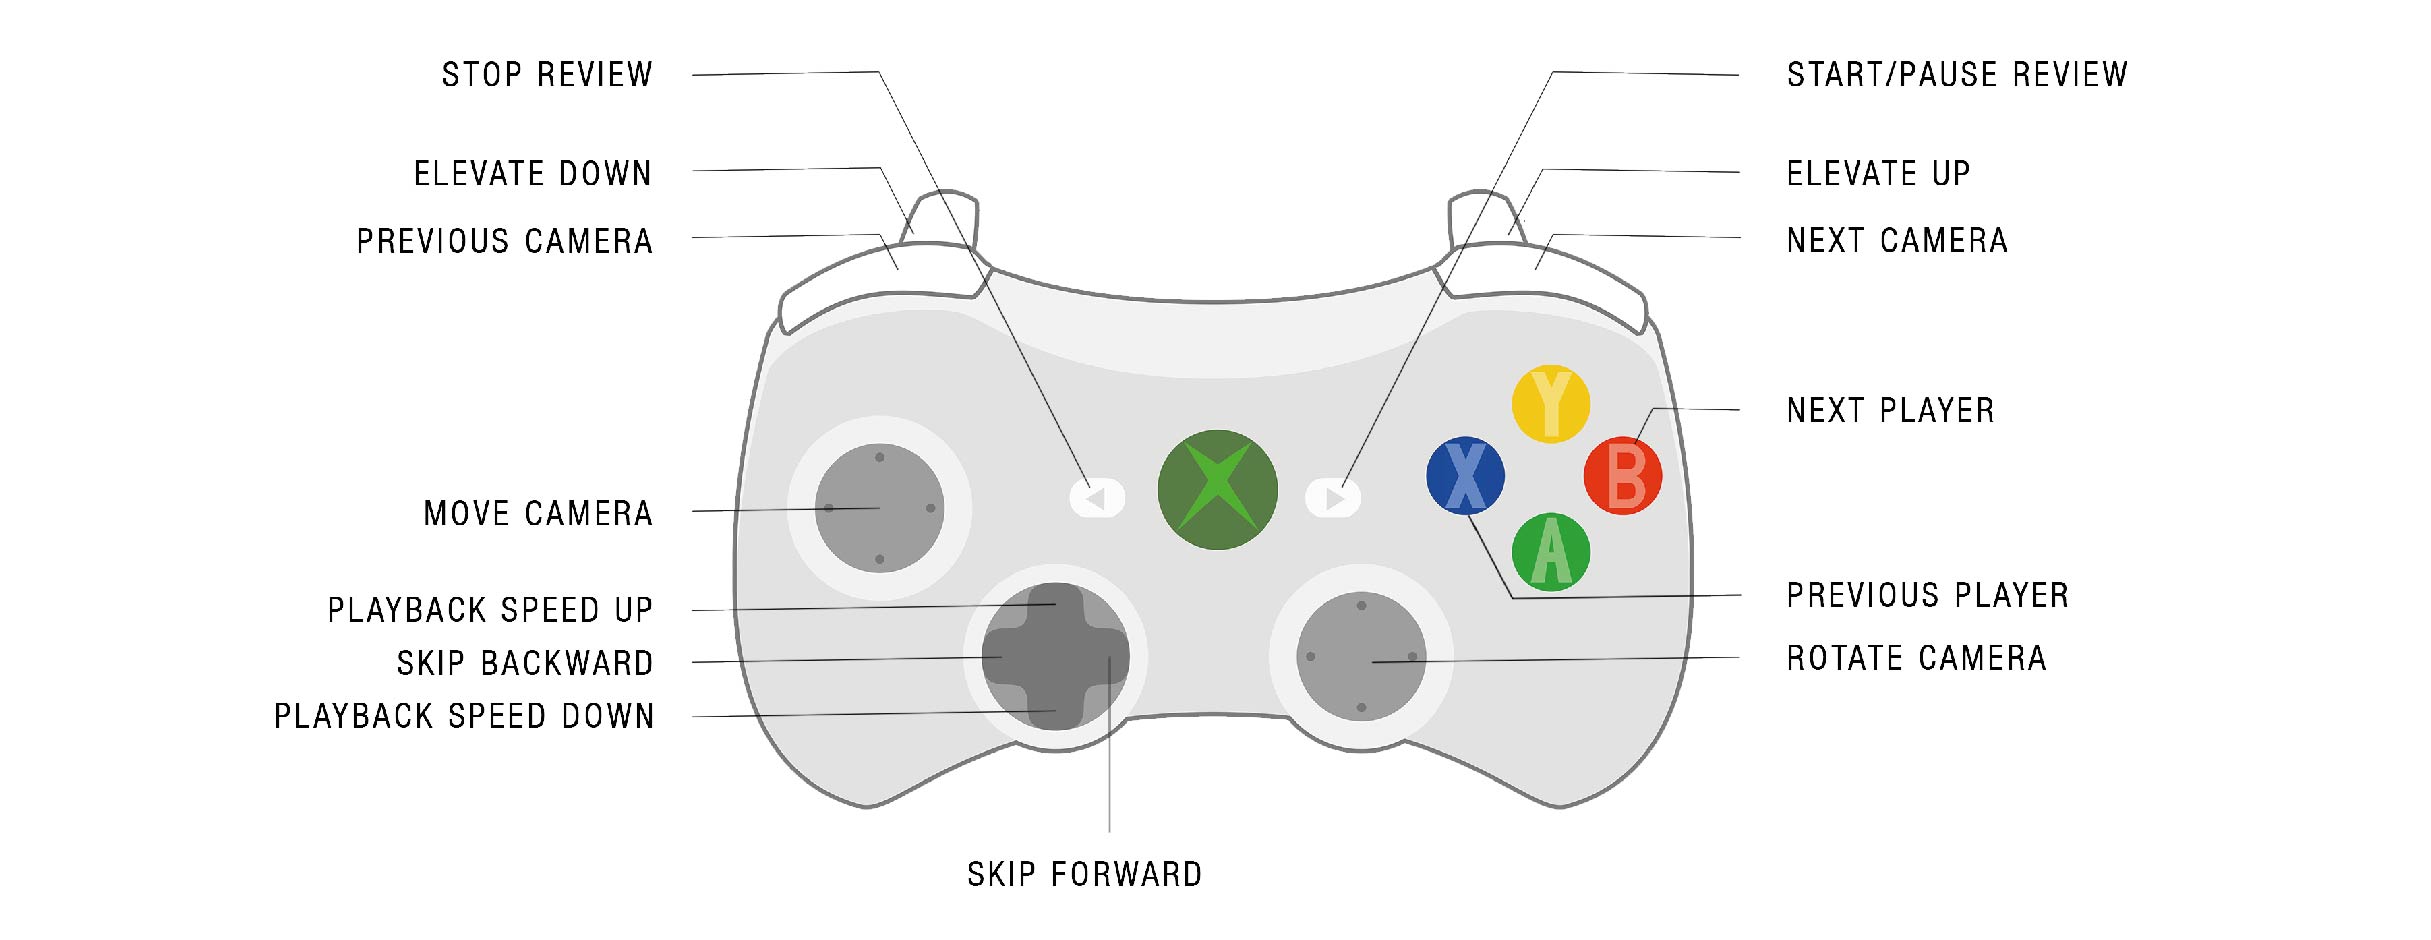
Check that the Spectator controls work with the Xbox controller.

In SUIT, go to Start training or Location setup (1).

Check to see if the status bar on the right is flashing red. If it is flashing red, open the status bar. Analyze the messages and resolve them using TroubleSUIT.
Training preparation
Before the training can start, certain data must be entered on the EXCON. In addition, the batteries must already be placed in the Smartvests and the Smartvests must already be switched on.
Users
In SUIT, go to Start training to get to the training screen. The following data should be entered in the 1. Users tab prior to training:
- Unit Name
- Name of each participant
- Height (cm) of each participant
- Arm width (cm) of each participant
The starting point of this manual is that this information has been entered by the instructor on this form and that this form has been submitted to the operator before the start of the training.
Click on 1. Users to enter the details of the participants.
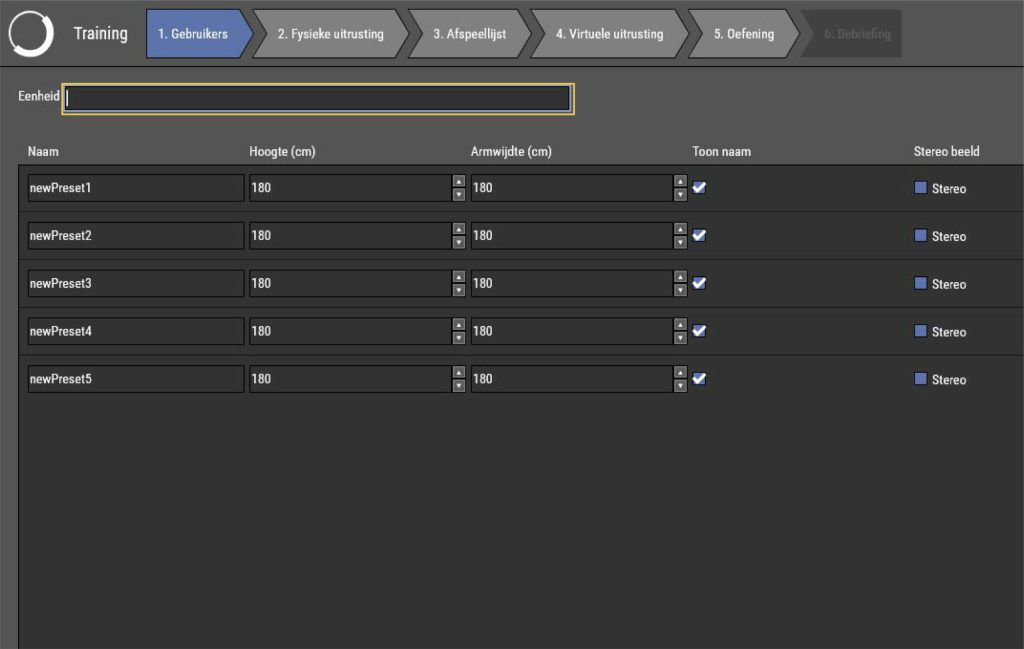
For unit, enter the name of the training unit.
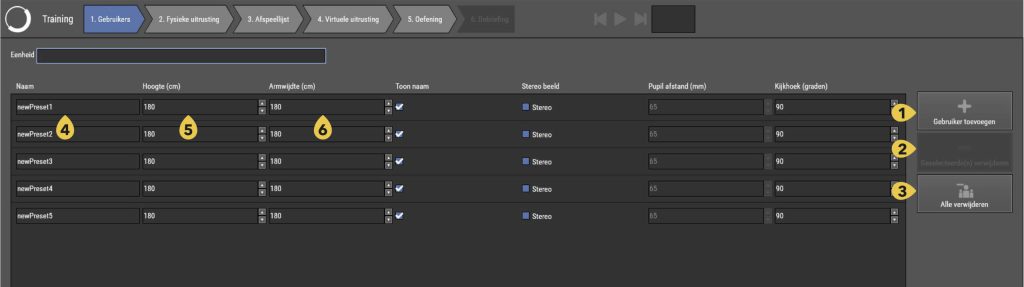
Add the number of participants with the button add new participant.
- Add a new participant
- Delete the selected participant
- Remove all participants
Enter for each participant: - Name
- Height (cm)
- Arm width (cm)
(optional) If stereo image – depth perception – is checked, also enter the pupil distance (mm).
If this information has not been provided by the instructor before the start of the training, the body length and arm width can be measured on site using the supplied tape measure in the top drawer of the EXCON.
Scenario playlist
The starting point of this manual is that a scenario playlist is provided by the instructor.
In SUIT, go to Start training to get to the training screen. Go to the 3. Playlist tab to enter the instructor-picked scenario playlist.
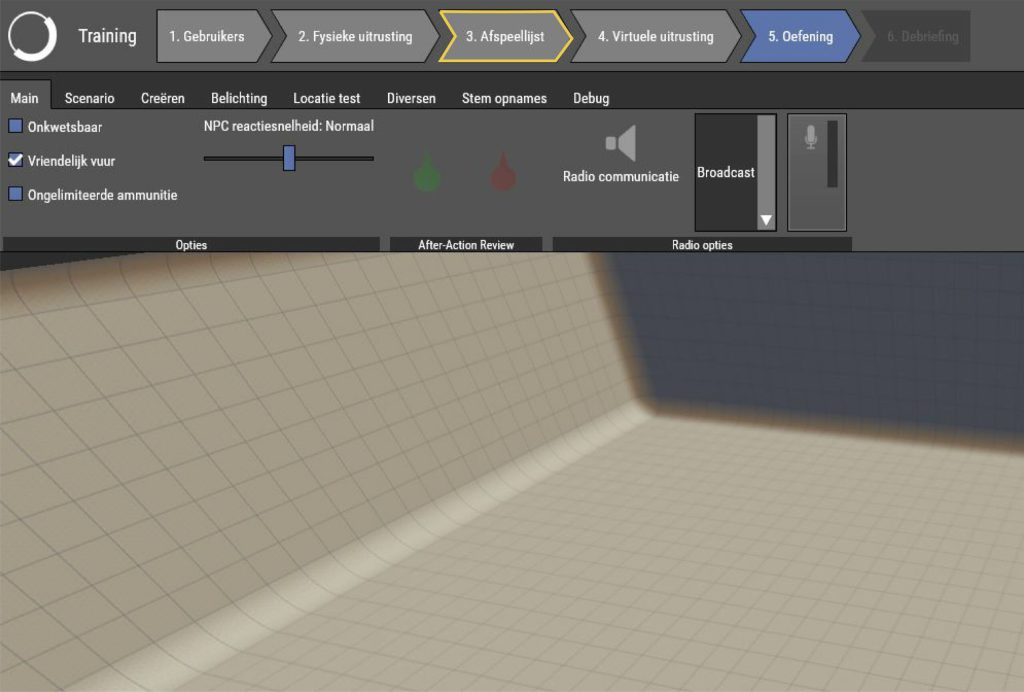
Click 3. Playlist to create a scenario playlist.
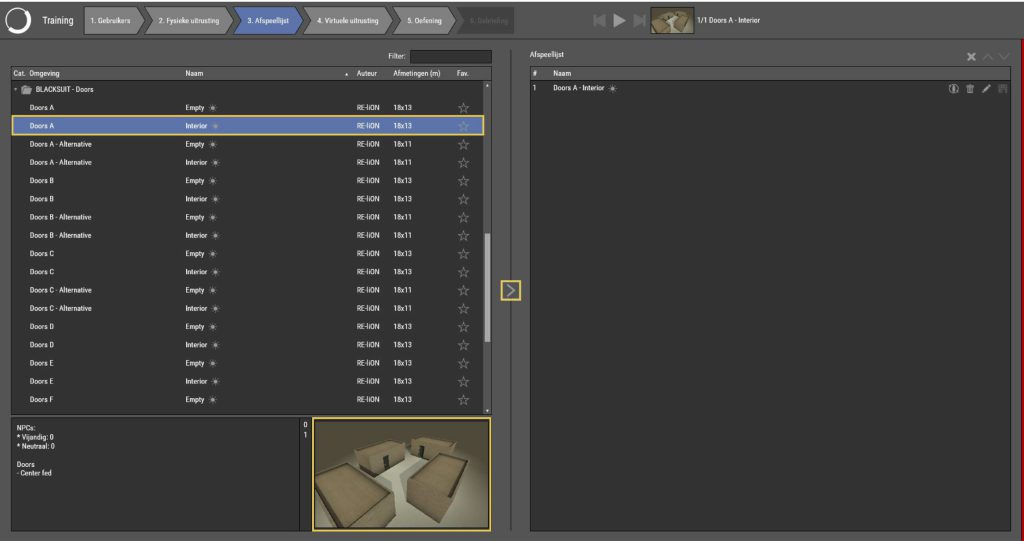
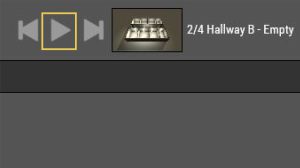
Click on a scenario. A preview of the scenario will be displayed at the bottom of the screen. Frequently used scenarios can be marked as favorite by selecting the star behind the scenario name. Double click on the scenario or click the arrow [>] in the middle of the screen to add the scenario to the playlist.
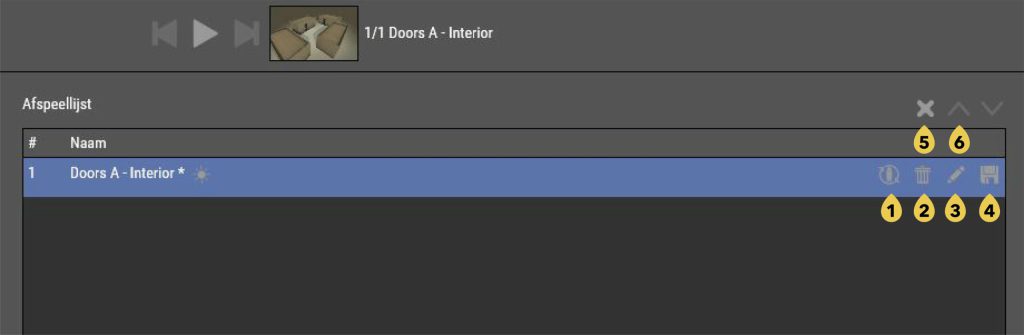
When the scenarios are in the playlist, several adjustments can be made:
- Click Refresh ammunition for all operators before starting the scenario, so that all participants regain their assigned amount of ammunition at the start of a new scenario.
- Click Remove from playlist behind the chosen scenario to remove the scenario from the playlist remove.
- Click Edit scenario behind the chosen scenario to edit the scenario. Editing a scenario that is already in the playlist is also called JIT editing – Just-In-Time editing.
- Click on Save as new scenario behind the chosen scenario to save an edited scenario.
- Click Clear Playlist to remove all scenarios from the list.
- If necessary, change the order of the playlist by clicking on a scenario and then manipulate them with the arrows – located just above the playlist – to move up and down.
Inserting batteries
Always make sure that three fully charged batteries are inserted in the Smartvests before each training session and that the Smartvests are turned on before the participants put on the Smartvest.

Slide the latch (1) to open the battery compartment cover (2).
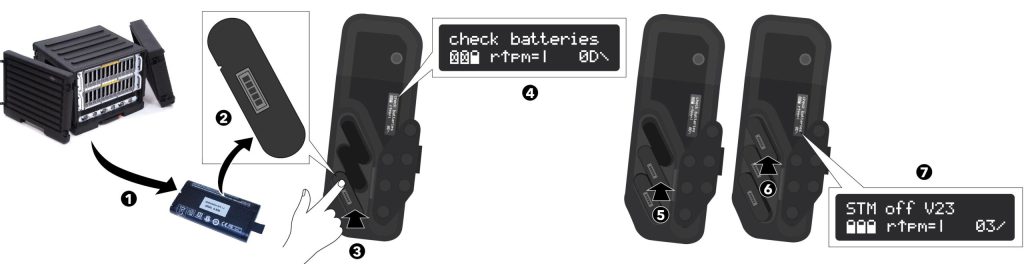
Insert three fully charged batteries into the battery compartment: Remove a fully charged battery from the battery charger (1) and place it with the display facing out and the slot down (2) in the lower battery compartment. Press on the battery so that it is held in place by the locking mechanism (3). The display of the Smartvest will now activate and display one full battery icon (4). Then, in the same way, place a fully charged battery in the middle battery compartment (5) and the top battery compartment (6). The display will now show three full battery icons (7).
PAY ATTENTION
If the message check batteries is still displayed after inserting the three batteries, then there may be the following are happening:
– The batteries are not seated correctly. Press the batteries in firmly so that they are held in place by a spring.
– The batteries are too empty. Before starting the workout, make sure you have three fully charged batteries in the Smartvest are installed.
– The batteries are too different in capacity. At the start of the training, make sure that three full charged batteries are installed in the Smartvest.
PAY ATTENTION
If the battery compartment cannot be closed properly, check if one of the rings might be stuck in between the battery lid.

Close the battery compartment cover (1). Slide the latch to the side to fully close the cover (2). Release the latch and make sure the tab of the latch engages the slot (3).
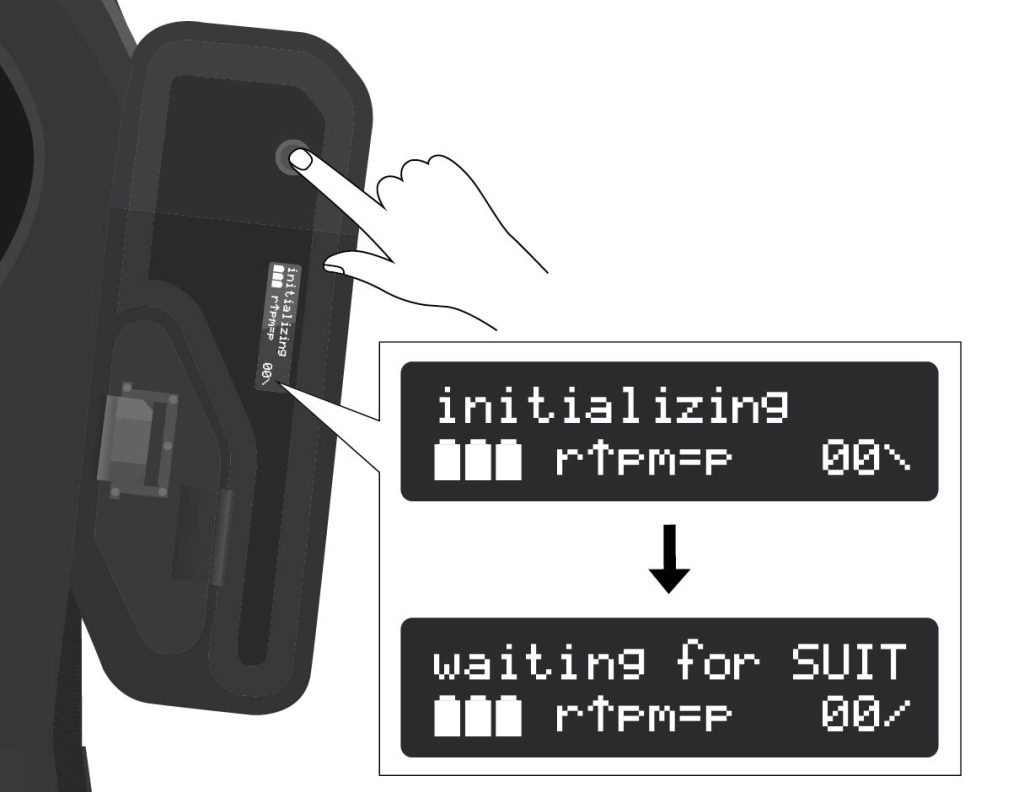
Turn on the Smartvest. Press and hold the ON/OFF button on the Smartvest until the display shows initializing. Then the display shows waiting for SUIT. The Smartvest is now ready for training.
PAY ATTENTION
If the message lid open is shown on the display after turning on the Smartvest, make sure that the battery compartment cover is closed properly. Slide the latch to the side to fully close the cover. Then release the latch and make sure the tab of the latch engages the slot
Physical gear preparation
Donning a Smartvest
The starting point of this manual is that before the training starts, three fully charged batteries are installed into the Smartvests and the Smartvests are turned on, as described in the install batteries guide.
WARNING
Pacemaker wearers are not allowed to wear a Smartvest.
CAUTION
The Smartvest can be donned by the participant himself, but it is easier – and there's less chance of damaging cables and straps – when someone helps.
CAUTION
Never drop the headset. Never put the Smartvest down anywhere, but only hang it on the hanging rack.
PAY ATTENTION
All straps must be tight, but should not be pinching.
PAY ATTENTION
It can get very hot in the Smartvest during training. Keep this in mind: wear light clothing and do not wear a Smartvest in full uniform.
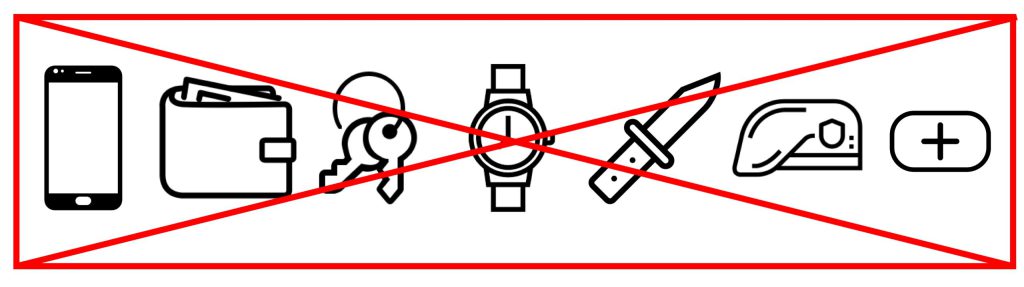
Empty all pockets before putting on the Smartvest. Be careful with metal surfaces and other disruptive objects:
- Phone
- Wallet
- Keys
- Watch
- Knife(s)
- Barret
- First aid kit
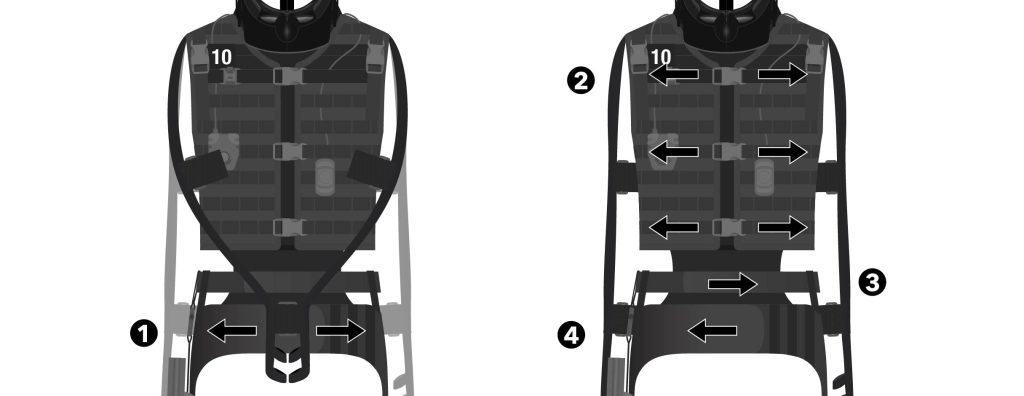
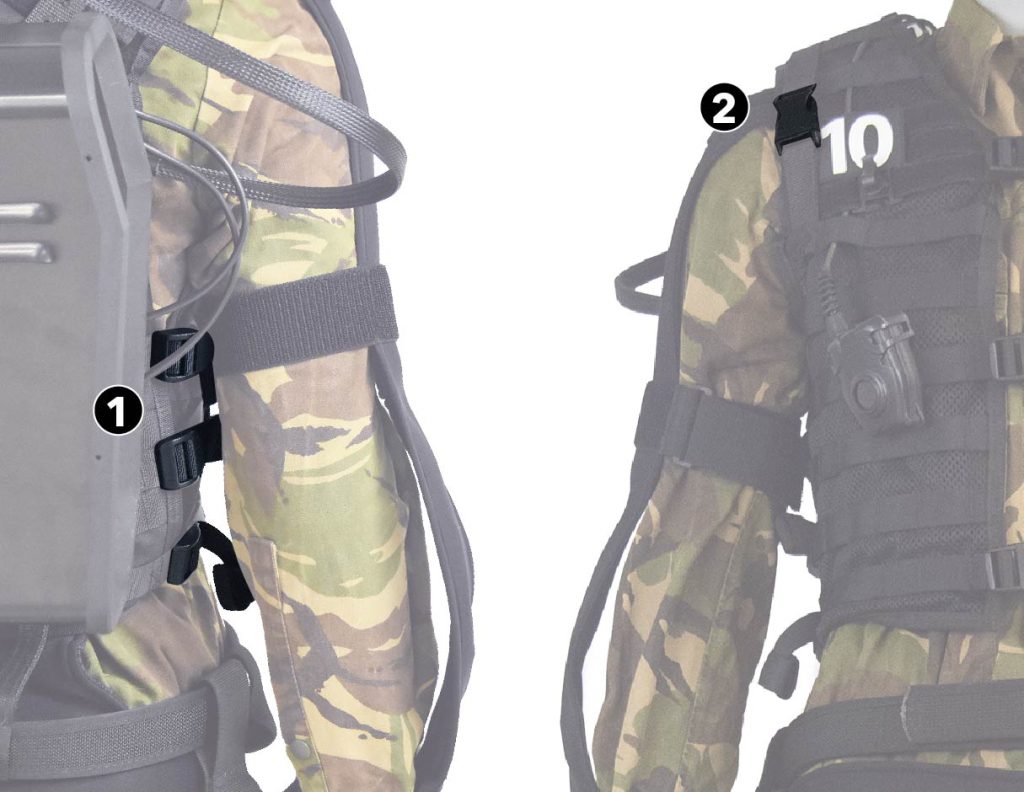
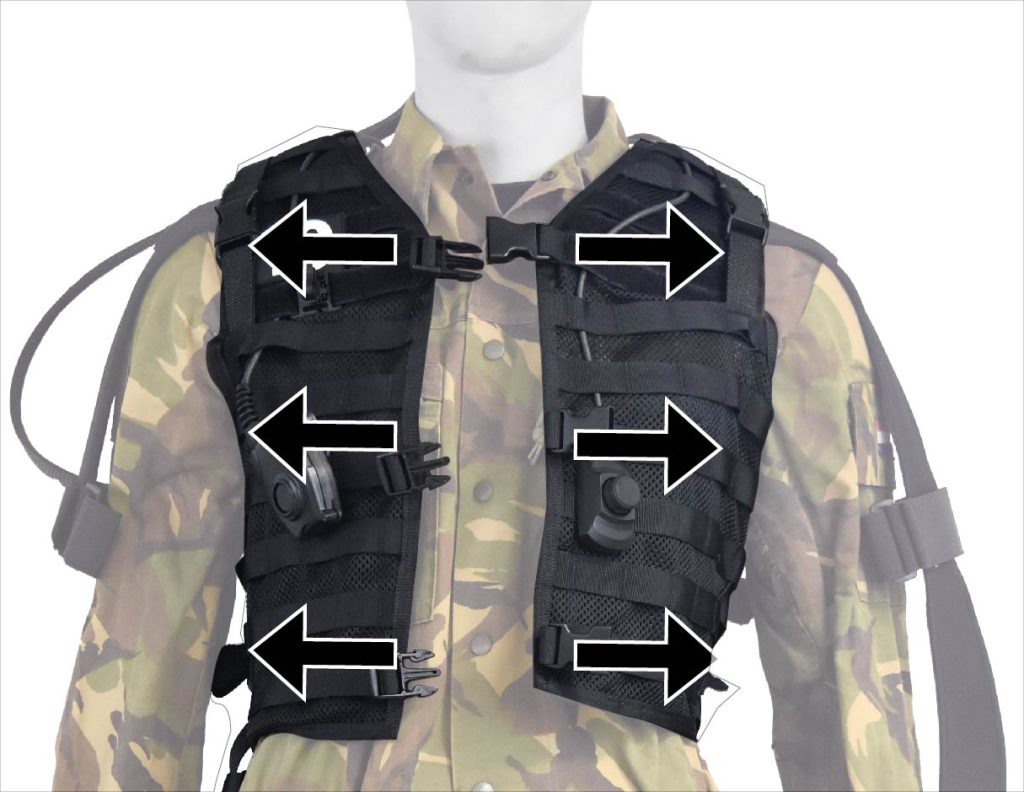
Loosen the Velcro that connects the arms together and let the arms hang loosely along the Smartvest (1). Then release the three clips on the front of the Smartvest (2) and release the Velcro straps from the hip belt (4).
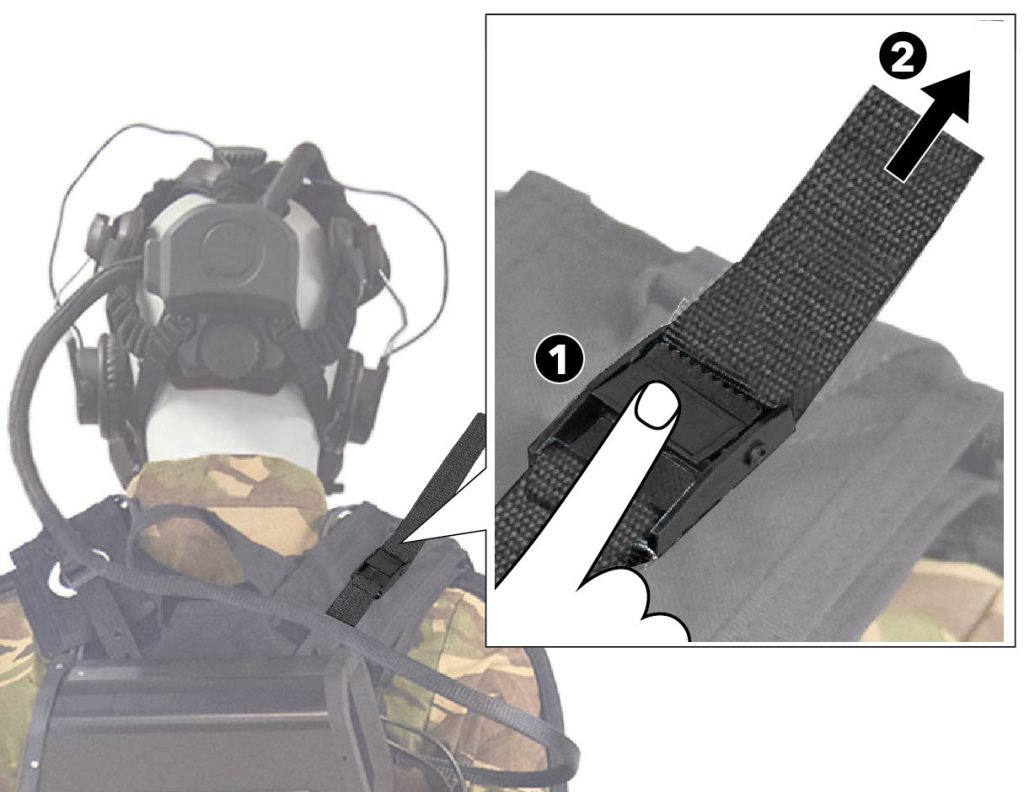
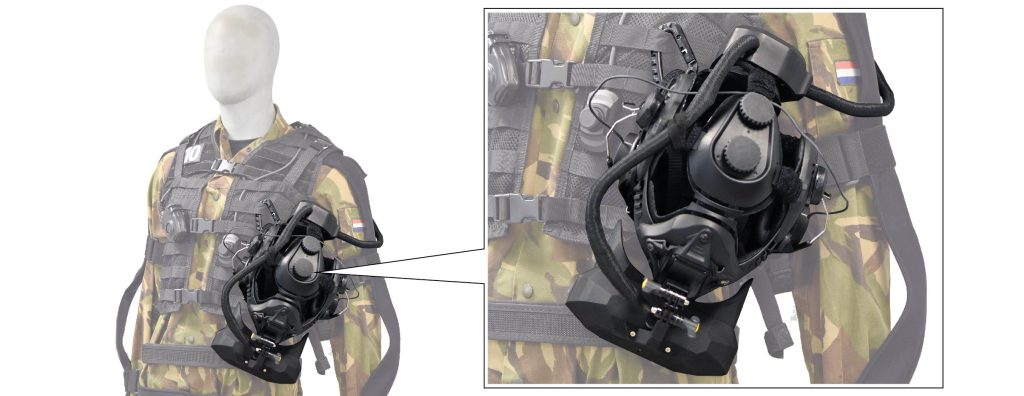
Remove the headset from the hanging rack and place it on the head.
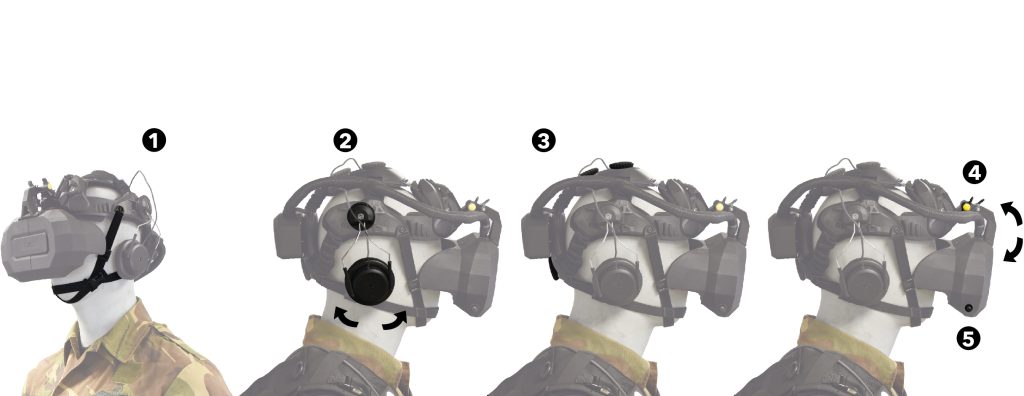
Secure the chin strap of the headset with the clip and adjust the straps so that the headset is securely fastened (1). Slide the earcups onto the ear (2). Adjust the headset with the two rotary knobs on top of the head and the rotary knob on the back of the head, so that the headset fits snugly everywhere (3). Loosen the wing bolts with the yellow knobs and move the HMD in the correct position (4). Then tighten the wing bolts to secure the HMD in this position. Finally, turn the knob on the right of the HMD to adjust the distance between the lenses as desired (5).
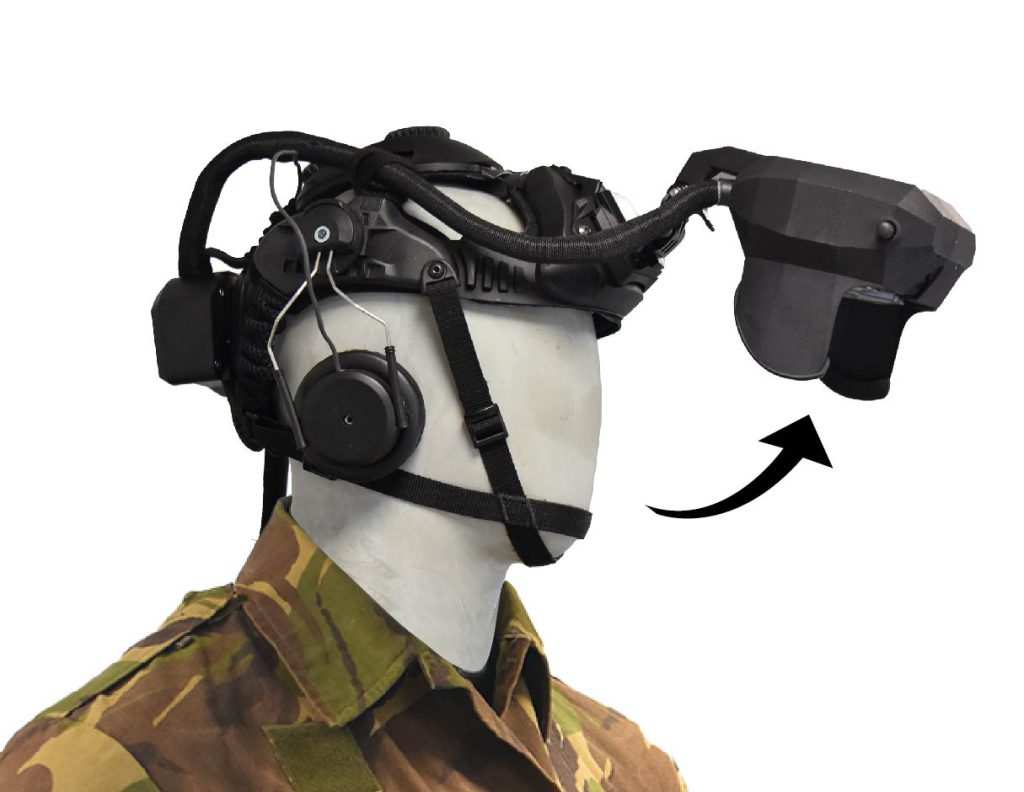
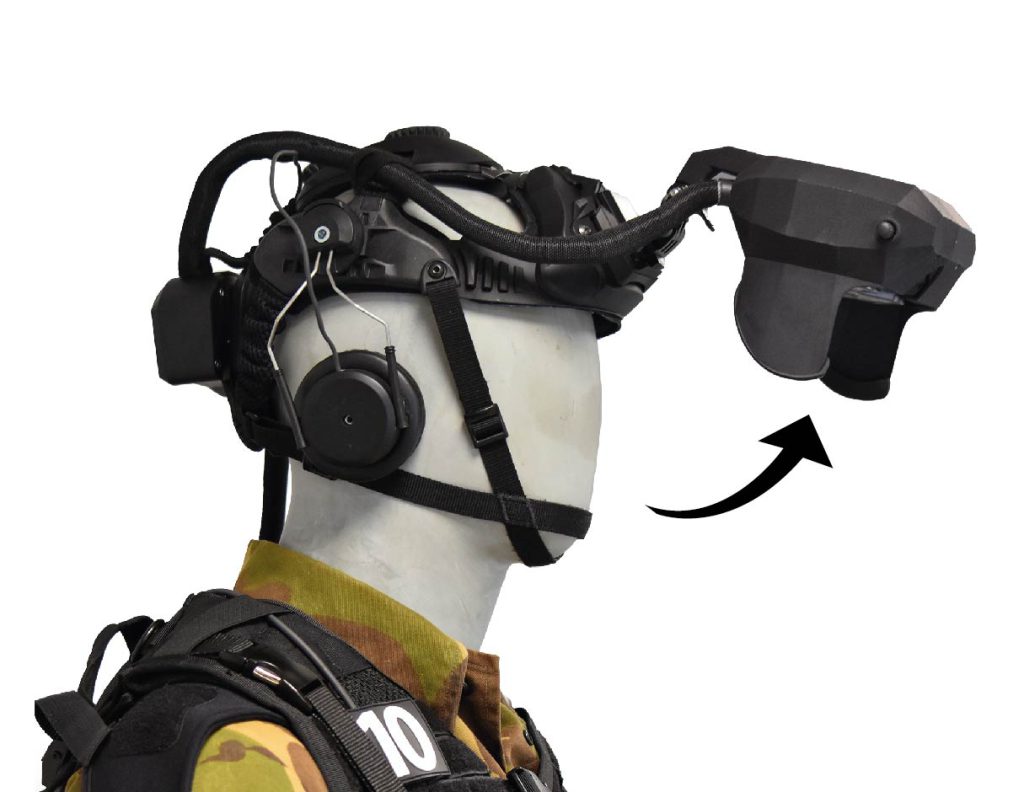
Fold up the HMD so that the Smartvest can be donned.
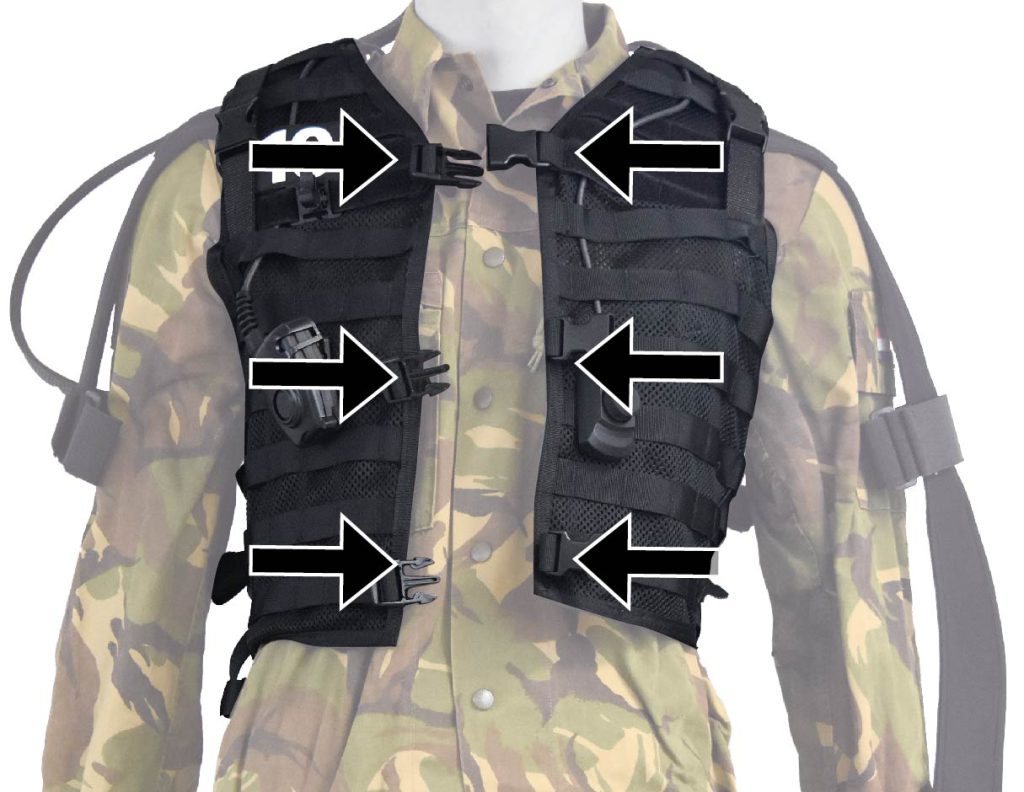
Take the Smartvest off the Smartvest hanging rack and pull it on. Close the three clips on the front of the Smartvest.

Fasten the hip strap. Make sure that the pelvis sensor – the stitched square – is on the centre back of the tail bone.
PAY ATTENTION
The hip strap should be around the hips, not above them!
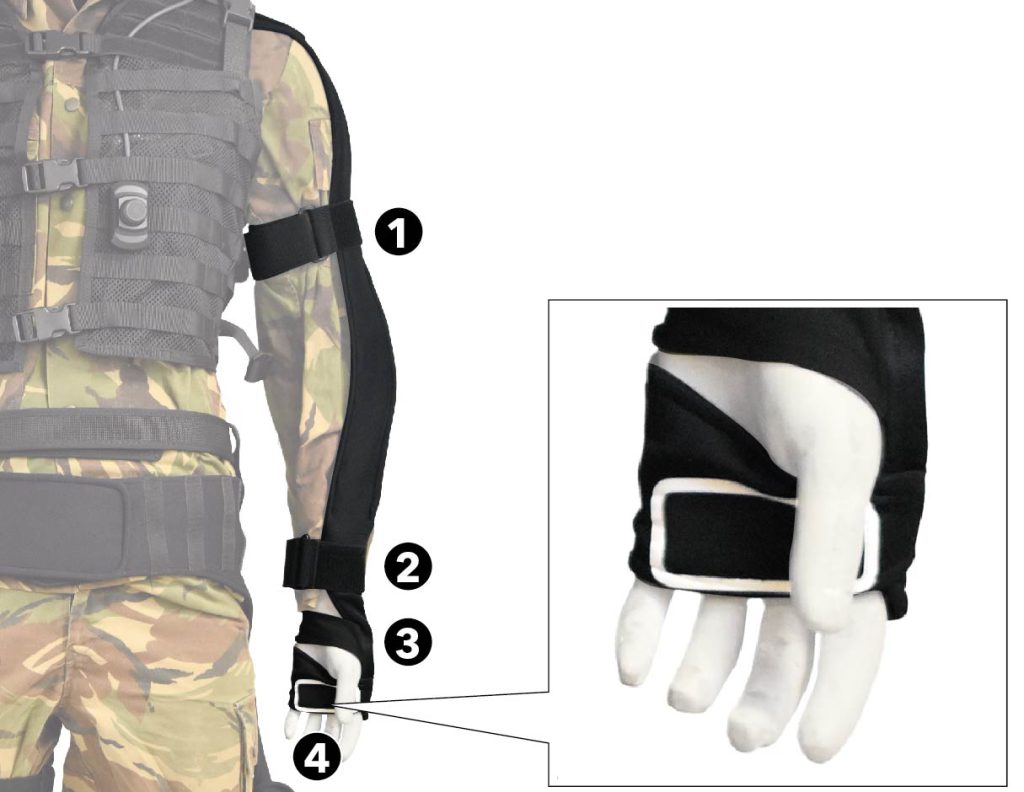
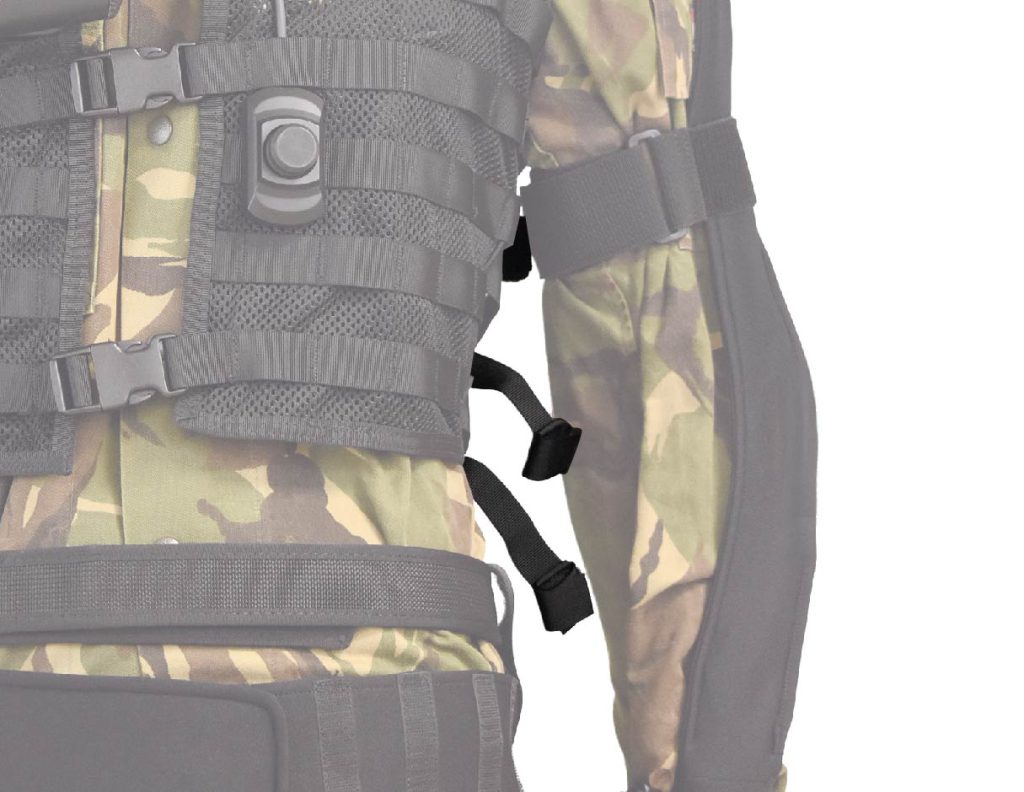
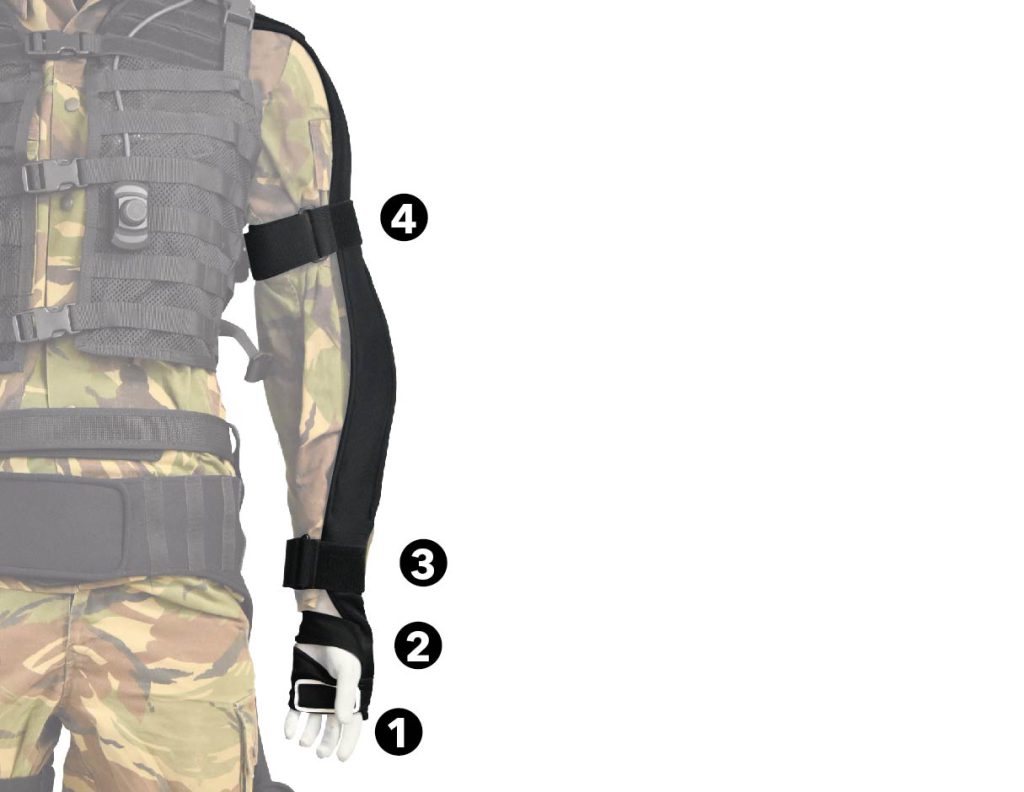
Fasten the left and right arm strap:
Fasten the upper arm strap first(1), then fasten the lower arm strap, making sure that the arm strap runs along the outside of the arm (2). Put your hand through the wristband (3). Finally, fasten the grip strap and make sure the hand antenna – the white outlined rectangle – runs across the center of the palm (4)
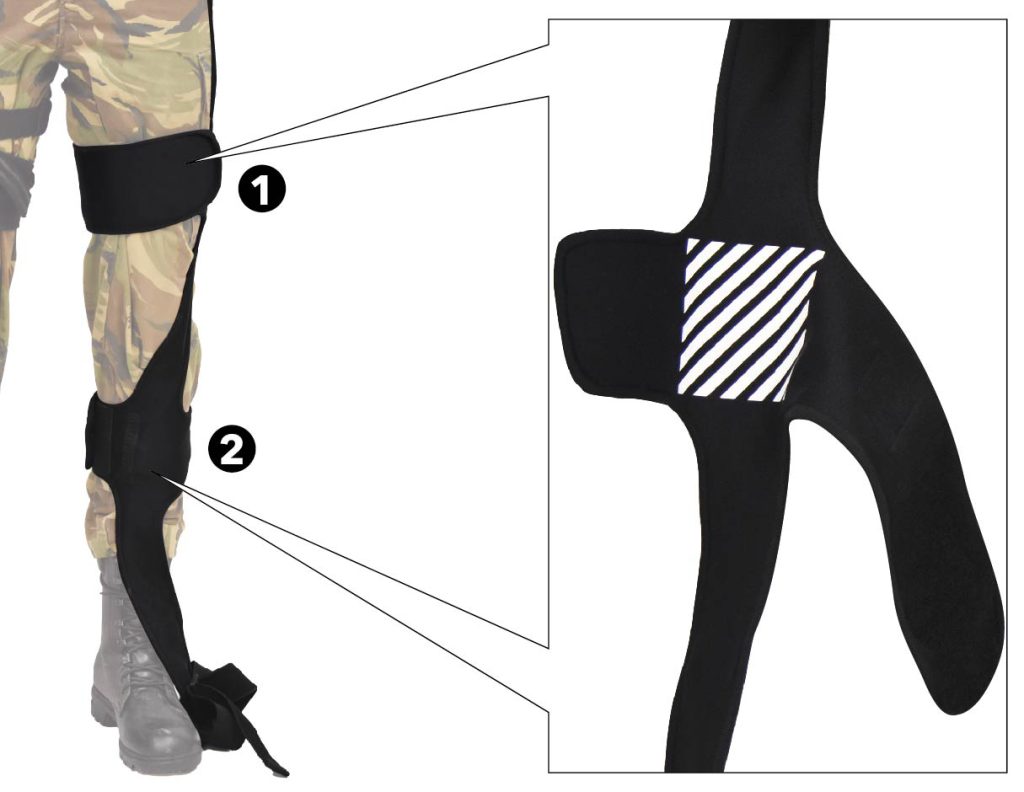
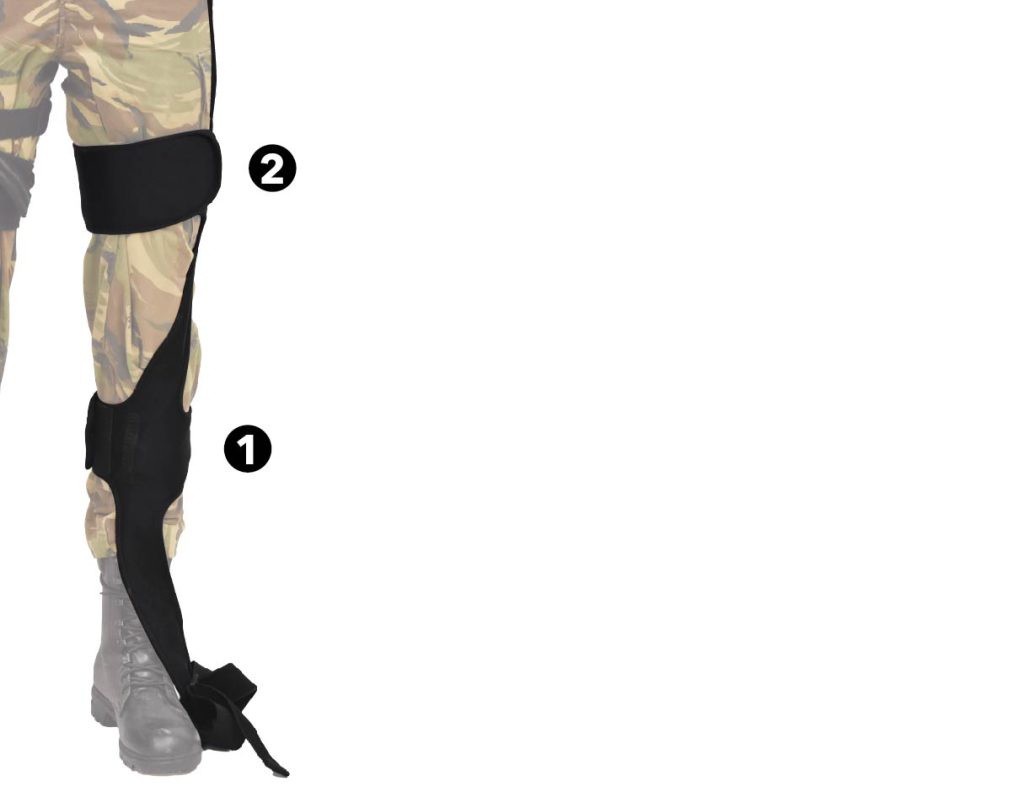
Fasten the left and right leg straps:
First fasten the thigh strap and make sure that the upper leg sensor – the striped area – is against the side of the thigh (1). Then fasten the lower leg strap and make sure that the lower leg sensor – the striped area – is against the shin, just below the knee (2). The leg strap runs from the side of the thigh to the front of the lower leg.
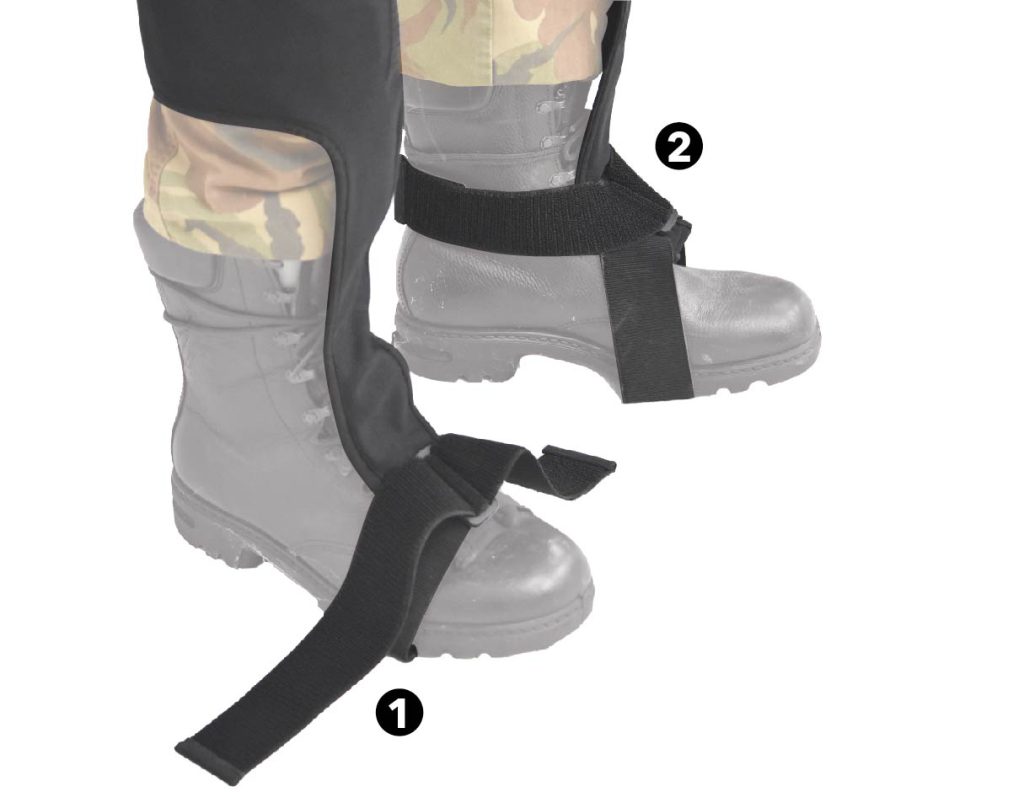
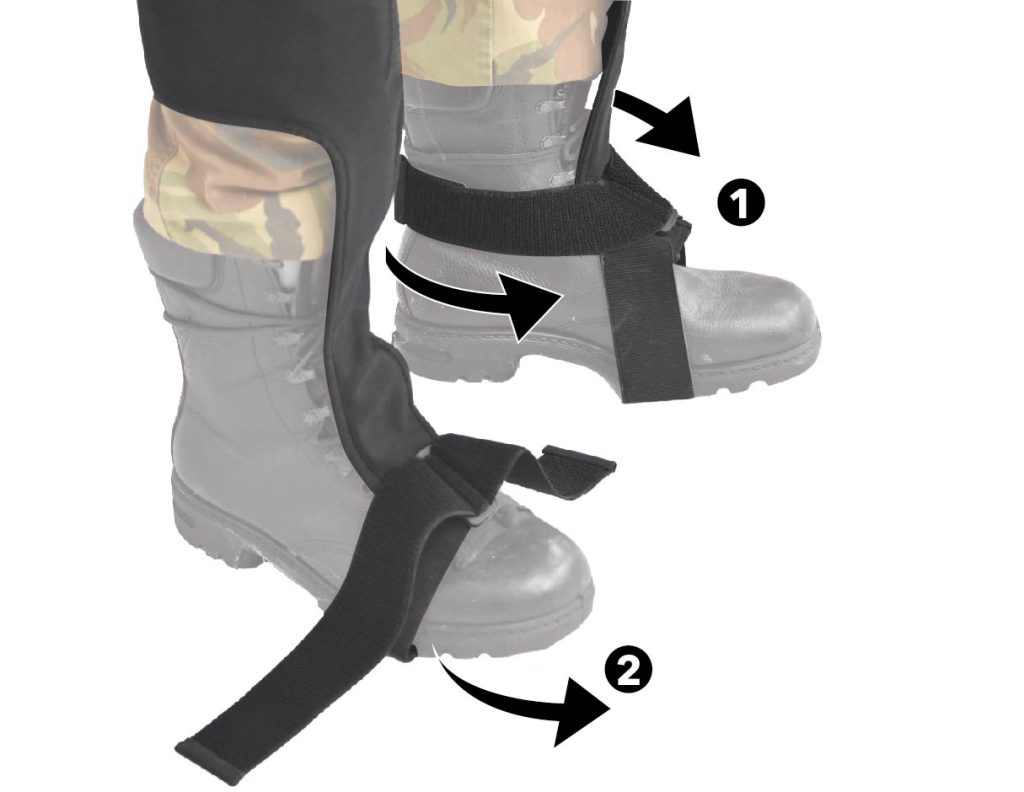
Fasten the left and right foot straps:
Slide the foot strap over the instep of the foot and tighten the straps (1). Make sure that both straps are about the same length and fasten them with the Velcro at the heel of the foot (2).
If necessary, push in the adjustment clips on the left and right shoulders (1) and tighten the shoulder straps (2) so that the weight of the backpack box is shifted to the shoulders instead of the lower back.
If necessary, tighten the three straps on the left and the three straps on the right side so that the Smartvest fits securely.
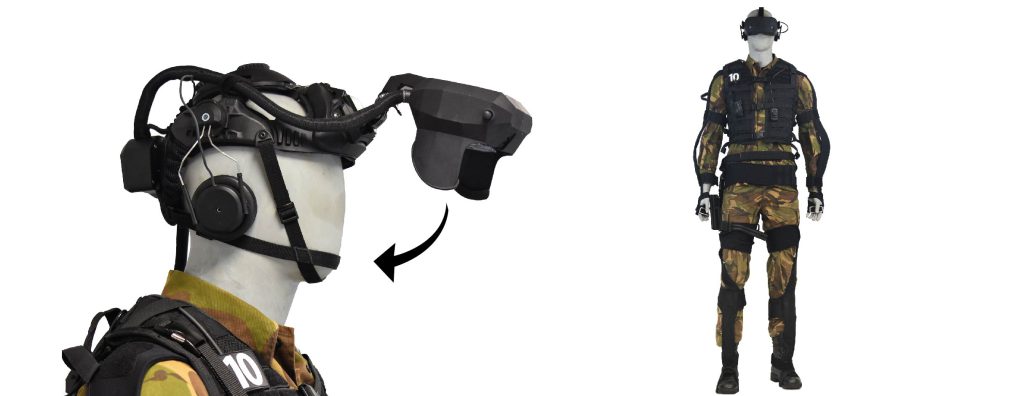
Fold the HMD down again. The participant is now ready to go through the Smartvest setup and calibration.
Smartvest setup and calibration
PAY ATTENTION
Wait with grabbing any gear until calibration is complete. Wait until the operator gives instructions to do so.
PAY ATTENTION
Before calibrating the Smartvest, make sure that all straps are securely fastened and that the hip strap is properly positioned on the hips, with the pelvis sensor in the middle of the back.
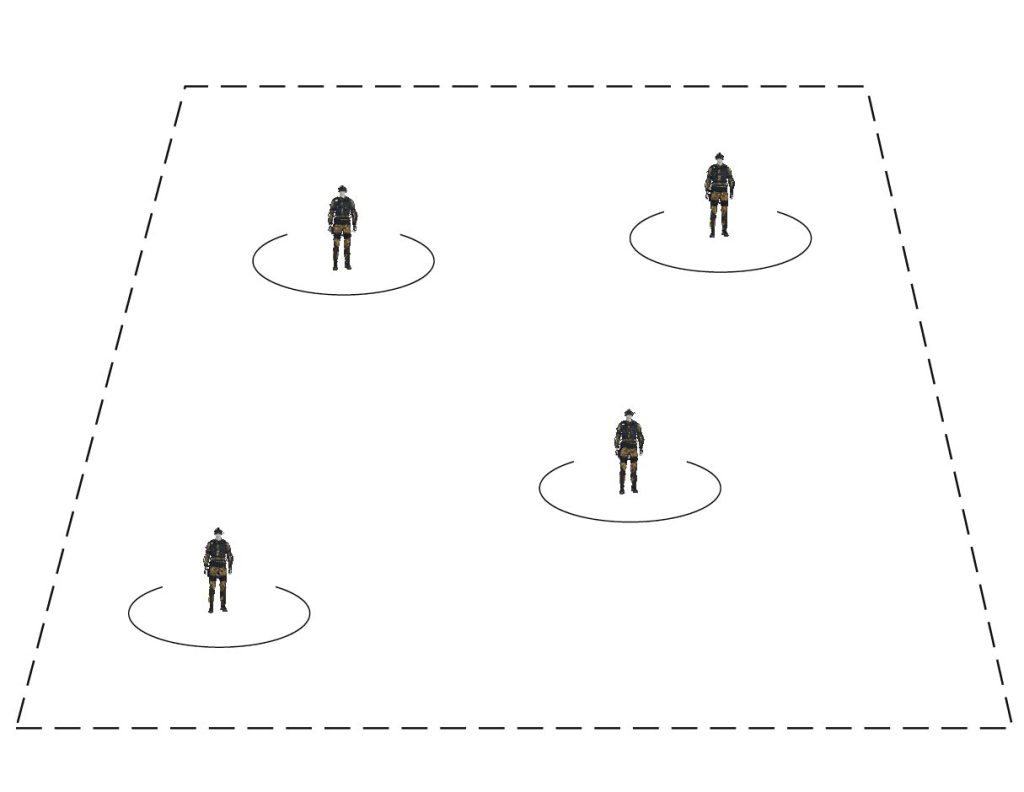
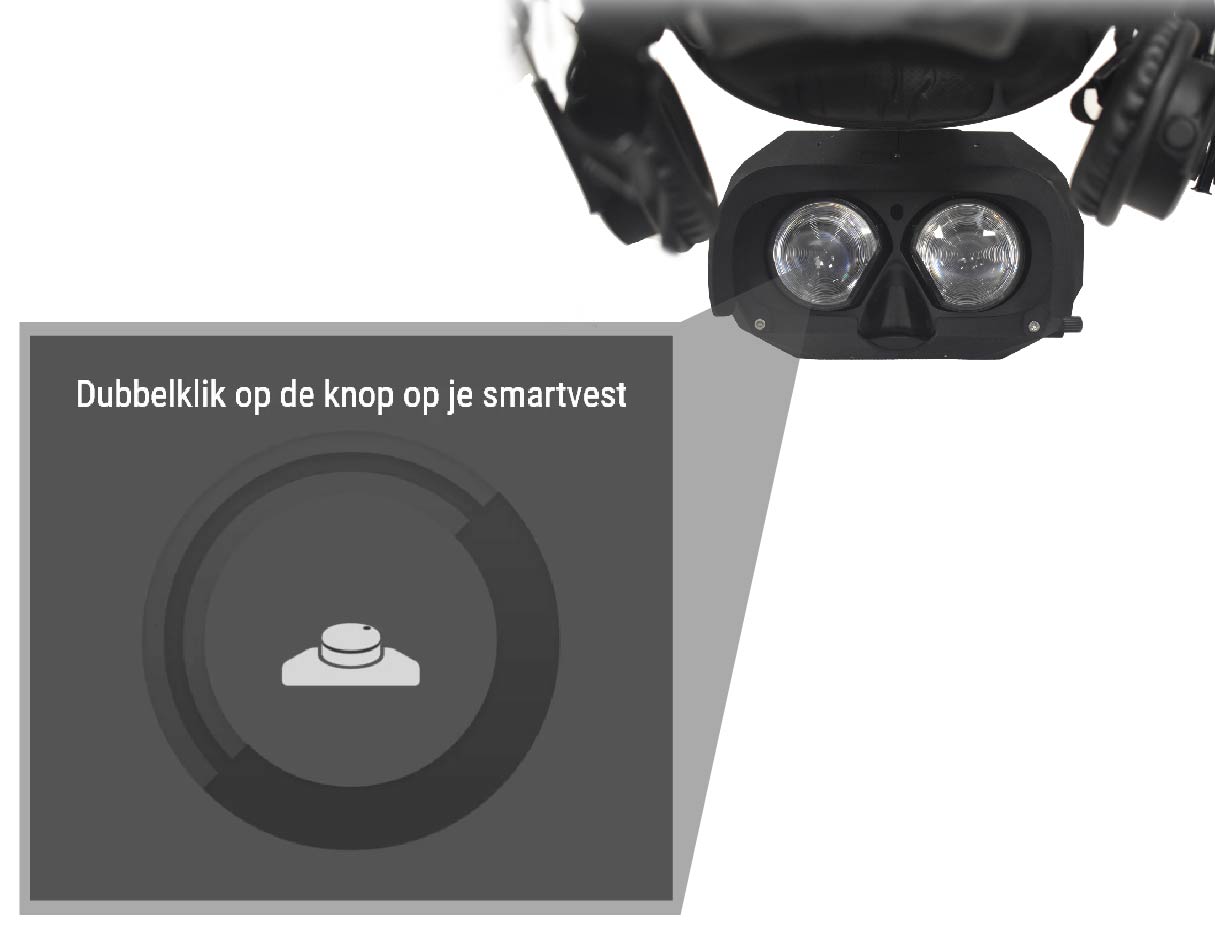
Find a free space in the field, not too close to the edge of the field or too close to another participant (1) and press the rotary knob two times to start setup and calibration (2).
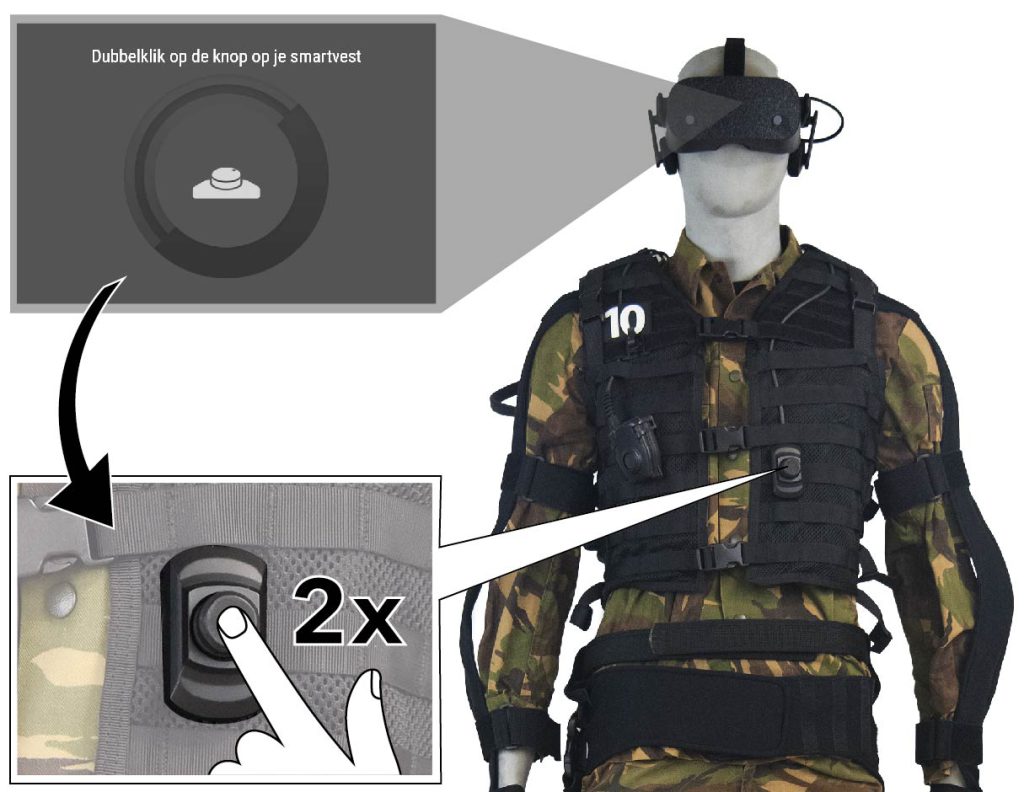
Press the rotary knob two times to start the setup and calibration.

Go through the setup and calibration by following the instructions displayed in the HMD.
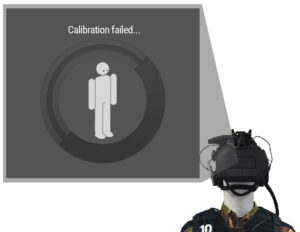
If the calibration failed, repeat the steps at a different location in the field.
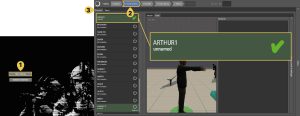
Check on the EXCON in SUIT whether the calibration of the Smartvests were successful. Go to Start training → 2.Physical gear and click on the Smartvests tab. When there is a check mark next to the name, the calibration is successful. If the calibration failed, the Smartvest must be recalibrated.
PAY ATTENTION
If a situation occurs where the start screen is displayed again in the HMD while the participant has not taken off the Smartvest in between, then select Load calibration to reload the last setup and calibration. Follow the instructions displayed in the HMD.
Turning on the replicas
Take the Glock out of the replica case and turn it on by holding the ON/OFF button for 1 second. The Glock is powered when the left LED-light lights up.
- Green: Full charge
- Orange: Half charge
- Red: Almost empty

Take the longgun out of the replica case and turn it on by holding the ON/OFF button for 1 second. The longgun is powered when the left LED-light lights up.
- Green: Full charge
- Orange: Half charge
- Red: Almost empty
Briefly press the L/R button on the HTC tracker on the replica to power it on.
- Glock should be set on L
- Longgun should be set on R
Connect the powerbank cable to the tracker.
Virtual gear preparation
Virtual gear
Click 4. Virtual Gear. Here, each participant’s virtual appearance and equipment can be assigned or modified.
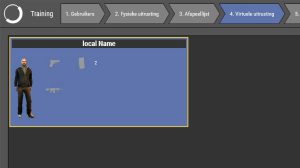
Select a participant by clicking on it, or select multiple participants by clicking on them while holding down the Ctrl key. If the participants are wearing one or more replicas, this will be displayed on the screen.
Change a participant’s virtual appearance, if desired. Click on ‘Change appearance‘ to change the virtual appearance of the selected participant(s).
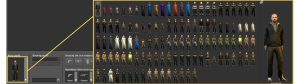
Add items to a participant’s virtual gear. Under Available, click an item to add it to the virtual equipment of the selected player(s). The participant’s virtual equipment will be displayed on the screen next to that participant. Nine menus are available with items for the virtual gear:
- Pistols Guns
- Ammunition
- Grenades
- Explosives
- Glowsticks
- Breaching
- Binoculars
- Miscellaneous
PAY ATTENTION
When these items are assigned while playing a scenario, these items will not be included in the next scenario. If items are assigned before the scenario starts – in the 'Waiting room' – the participants starts with the assigned items in each scenario.
Under Gear, the selected participant’s virtual gear is displayed.
With the left mouse button an item can be removed from the virtual gear of the selected participant.
Right-clicking increases the quantity of the selected item by 1.
With multiple selected participants, the matching items are shown and these items can be removed or multiplied for all selected participants at once.
After adding items to a participant’s virtual gear, the entire virtual gear of the selected participant can be saved as a preset, so that this preset can be applied to another participant at once or during a next training. Under equipment preset – in the input field – enter a name for the preset and click on save. A saved equipment preset can be selected in the drop-down menu under equipment preset. Then click apply to apply this preset to the selected participant(s) or click delete to remove the equipment preset from SUIT.
Training in SUIT
PAY ATTENTION
Individuals who suffer from motion sickness or have problems with their balance (Vestibular system) may experience nausea or dizziness while training in SUIT. In that case, take your time to get used to the virtual environment in SUIT. If nausea or dizziness is nevertheless experienced, step out of the scenario and take the headset off for a while outside the training field.
PAY ATTENTION
If a situation occurs where the start screen is displayed again in the HMD while the participant has not taken off the smartvest in between, then select Load calibration to reload the last setup and calibration. Follow the instructions displayed in the HMD.
SUIT introduction
When one or more participants start training with SUIT for the first time, a short explanation must be given prior to the training. Subsequently, a number of tutorial scenarios are available in which participants can become acquainted with the possible physical movements in SUIT and the result in the virtual world. After the verbal instructions and the tutorial scenarios, you can move on to the instructor’s scenario playlist.
- General explanation
- Tutorial Doors
- Introduction Replica
- Tutorial introduction
- Tutorial Gear
- Tutorial Breaching
Component
Description
SUIT
SUIT – Small Unit Immersive Trainer – is a virtual training system for training special units and infantry. The system enables military personnel to virtually train how to operate in urban areas and to eliminate terrorists. The computer on which the system can be controlled.
EXCON
Scenarios can be prepared, started and influenced on this.
Training field
The training field is surrounded by posts with radio receivers, which determine the position of the participants in the field. Make sure that the posts around the training field do not move or fall over.
Spectator
The system for During Action View (DAV) and After Action Review (AAR). During and after the training, images of the virtual exercise can be played on this. Images are shown on both a projection screen and a touchscreen. The instructor can use the touchscreen and the game controller to determine from which point of view he wants to view the scenario and what additional information should be displayed.
No replicas are needed in this tutorial yet. This tutorial has the following objectives:
- Practice walking around in a virtual environment
- See other participants in a virtual environment
- Open virtual doors
- In SUIT, go to 3. Playlist.
- Open the folder BlackSUIT – General and select the environment Tutorial – Doors.
- Click the arrow > to add the environment to the playlist and make sure that this environment is at the top of the playlist.
- Instruct the participants to go to (one of) the start zone(s). A start zone is visible as blue plane (friendly team), white plane (neutral team) or red plane (enemy team) in the HMD.
- Click on play at the top right of the screen to start the scenario.
- Instruct the participants to walk around and open doors.
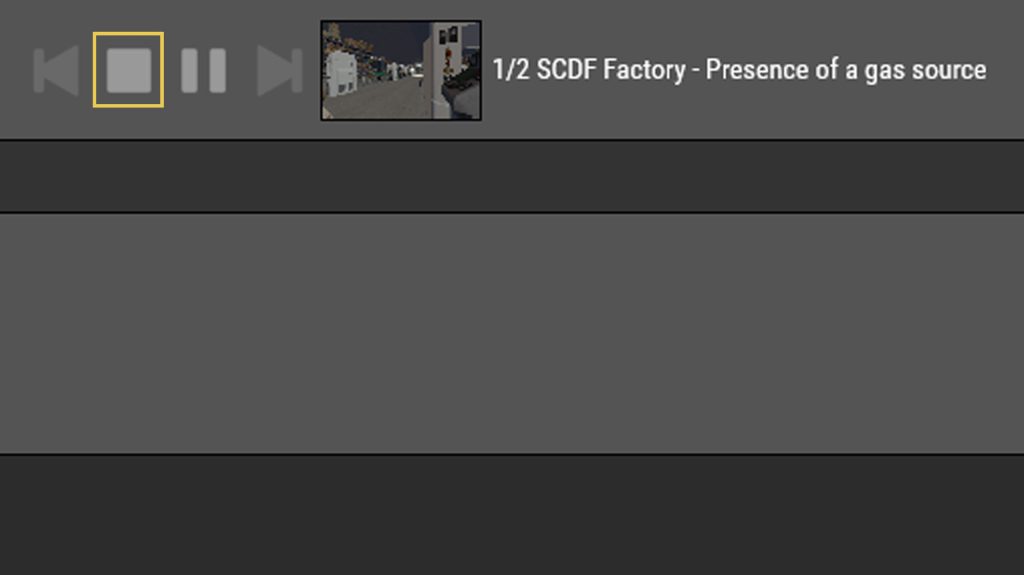
- Click on stop at the top right of the screen to stop the scenario.
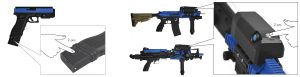
Explanation primary replicas
Features that work the same as a real weapon
Not possible compared to a real weapon
Shoot
Reload
Turn on laser
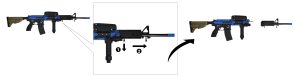
Explanation secondary replicas
Features that work the same as a real weapon
Not possible compared to a real weapon
Shoot
Reload
Unable to take out the magazine
Practice with Replicas
- Instruct the participants to grab and calibrate a Glock replica.
- In SUIT, go to Virtual Gear.
- Give all participants ammunition or apply an equipment preset with enough ammo to all participants.
PAY ATTENTION
It is also possible to check under 5. Exercise → Main tab → Unlimited ammunition. Be aware that this – if not desired for the training – is unchecked again.
- In SUIT, go to 5. Exercise and select the Create tab.
- Place some NPCs in the waiting room. Click Place a character in the world, choose the equipment and behavior of the NPC and place the NPC in the desired location.
- Instruct the participants – in the waiting room – to practice shooting.
- Repeat the above steps with a primary replica – Colt, HK or Minimi.
After the explanation and practice with the replicas, a complete practice scenario can be performed. Guide the players through the scenario by explaining in each room what to do in the room, how to walk to the next room, and what to expect there. This tutorial has the following objectives:
- In SUIT, go to Playlist.
- Open the folder BlackSUIT – General and select the environment Tutorial – Introduction.
- Click on the arrow > to add the environment to the playlist and make sure that this environment is at the top of the playlist.
- Instruct the participants to go to (one of) the start zone(s). A starting zone is visible as a blue plane (friendly team), white plane (neutral team) or red plane (enemy team) in the HMD.
- Click on Play at the top right of the screen to start the scenario.
- Guide the participants through the scenario.
- At the end of the scenario, click on stop at the top right of the screen to stop the scenario and instruct the participants to gather around the Spectator. The instructor can evaluate the practice scenario on the Spectator.
In consultation with the instructor, and depending on the training goal, the Gear tutorial can be added to the introduction in SUIT. Throwing flashbangs and glowsticks is practiced here.
This tutorial has the following objectives:
- Flashbangs and glowsticks
- Disable enemy by throwing a flashbang
- Throwing glowsticks into a room
- In SUIT, go to Playlist.
- Open the folder BLACKSUIT – General and select the environment Tutorial – Gear.
- Click on the arrow > to add the environment to the playlist and make sure that this environment is at the top of the playlist.
- Instruct the participants to go to (one of) the start zone(s). A start zone is visible as a blue area (friendly team), white square (neutral team) or red square (enemy team) in the HMD.
- Click on Play at the top right of the screen to start the scenario.
- Instruct the participants to take a flashbang from the virtual gear and place it underhand in the to throw the neighbouring space:
- Press the rotary knob twice.
- Turn the rotary knob to select the menu item Pak Flashbang (__x) .
- Press the rotary knob to confirm the selection. An orange throwing arc appears indicating where the flash bang ends up.
- Bring the forearm back until the orange throwing arc turns red.
- Move the forearm forward to throw the flashbang.
- Instruct the participants to take a flashbang from the virtual gear and place it underhand in the to throw the neighbouring space:
- Press the rotary knob twice.
- Turn the rotary knob to select the menu item Glowsticks.
- Turn the rotary knob to select the menu item Pak Glowstick ([color]) (__x) .
- Press the rotary knob to confirm the selection. An orange throwing arc appears indicating where the glowstick ends up.
- Bring the forearm back until the orange throwing arc turns red.
- Move the forearm forward to throw the glowstick.
- At the end of the scenario, click on stop at the top right of the screen to stop the scenario.
In consultation with the instructor, and depending on the training goal, the Breaching tutorial can be added to the introduction to SUIT. This is where opening doors with the aid of explosives is practiced.
This tutorial has the following objectives:
- Take explosives from the virtual backpack and place them on a door
- Detonate explosives
- In SUIT, go to Playlist.
- Open the folder BLACKSUIT – General and select the environment Tutorial – Breaching.
- Click on the arrow > to add the environment to the playlist and make sure that this environment is at the top of the playlist.
- Instruct the participants to go to (one of) the start zone(s). A starting zone is visible as a blue plane (friendly team), white plane (neutral team) or red plane (enemy team) in the HMD.
- Click on Play at the top right of the screen to start the scenario.
- Instruct the participants to take an explosive from the virtual backpack and place it on the door:
- Press the rotary knob twice.
- Turn the rotary knob to select the Pak [explosive] menu item (C-charge, Charge linear, Lock charge or X-charge).
- Press the rotary knob to confirm the selection. An explosive device appears in the virtual hand.
- Hold the hand with the virtual explosive near a door and wait for it to be placed on the door.
- Instruct the participants to detonate the explosive.
- Press the rotary knob twice.
- Turn the rotary knob to select the menu item Detonate Explosive or Detonate Explosive in 10 seconds.
- Press the rotary knob to confirm the selection. The explosive explodes immediately or after ten seconds.
- At the end of the scenario, click on stop at the top right of the screen to stop the scenario.
Training in SUIT
Before the training can start, all preparatory steps in preparing training must be completed. That means the instructor’s playlist is prepared in SUIT before the training starts.
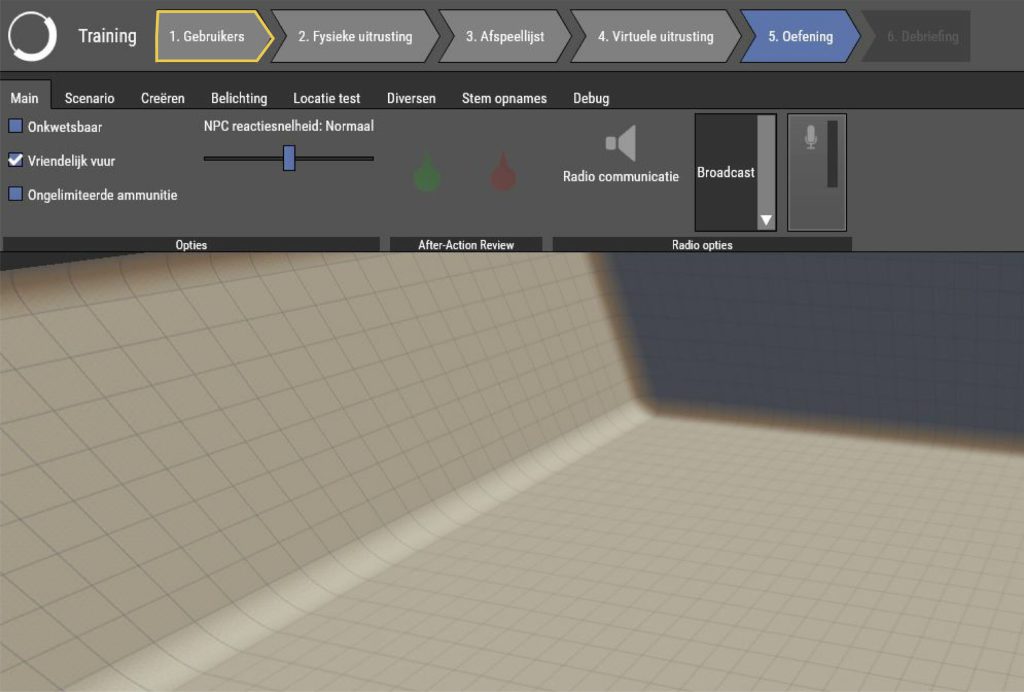
In SUIT, go to 5. Exercise.

Click < or > to select the desired scenario.
Click Play to start the scenario.
PAY ATTENTION
If an After Action Review of a previous scenario is played on the spectator, before starting a new scenario on click in SUIT on 5. Exercise → Tab Miscellaneous → Stop AAR.
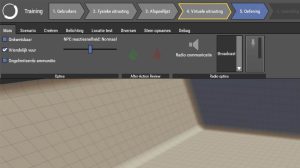
Follow the instructor’s instructions to adjust the scenario. The possible options can be found in Actions operator (during scenario).
At the end of the scenario, click Stop to stop the scenario. After this, the next scenario selected in the playlist.
The last played scenario can now be evaluated on the Spectator by the instructor.
While evaluating a scenario, participants can hang the headset from the clip on the chest of the Smartvest.
Instructor in Smartvest
If the instructor wants to view the scenario from the training field – in Smartvest – this can be set on the EXCON. In SUIT, go to 5. Practice → Select the appropriate participant → Select the Instructor option.
The instructor is now invisible to the participants (this can be adjusted by the instructor himself in the rotary menu). In addition, the instructor has a different, more extensive menu than the participants, to be able to make adjustments and influence the scenario: Instructor actions in Smartvest.
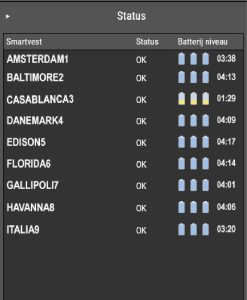
Replacing batteries
The operator can see the battery status of each Smartvest in the status bar. If the batteries are empty during the training, they can be replaced during the training. The instructor determines whether all participants will do a battery change or just the participant with empty batteries. When a battery is empty, replace all the batteries with fully charged batteries. The participants can help each other with changing the batteries.
PAY ATTENTION
The display on the battery indicates the battery charge by means of blocks. At five blocks, the battery is full.
WARNING
When batteries have been dropped or damaged, this must always be reported to RE-liON. These batteries should NOT be used anymore.
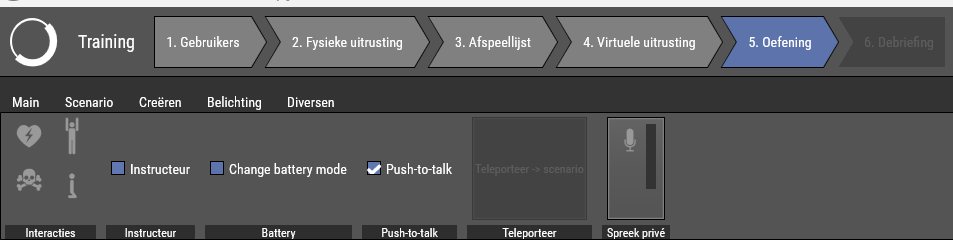
From the Exercise tab in SUIT, press CTRL + LMB to multi-select the participants that need their batteries changed. Look for the checkbox Change battery mode and check it.
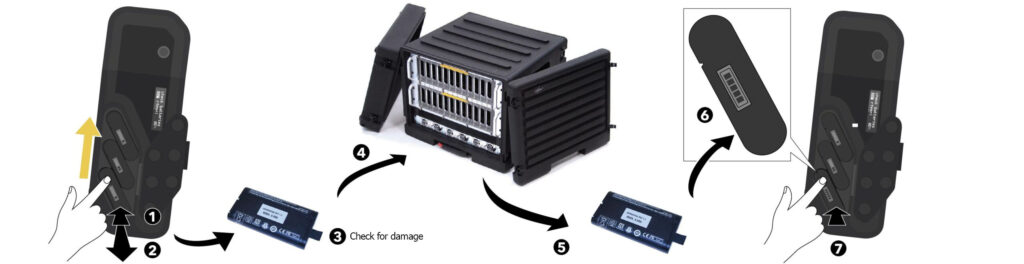
Open the battery lid and replace the lower battery first: Use the ring pull to remove the battery (1). The battery can then be removed manually (2). Check the battery for damage (3) and place it – only if it is not damaged – in the battery charger (4). Take a fully charged battery from the battery charger (5) and place it with the display out and the slot down (6) in the lowest battery compartment. Press the battery so it is firmly placed (7).
Repeat these steps for the middle battery and then for the top battery.
PAY ATTENTION
If the message check batteries is still displayed after inserting the three batteries, the following may be the case:
– The batteries are not seated correctly. Press the batteries in firmly so that they are held in place by the spring.
– The batteries are too empty. Make sure that three fully charged batteries are installed in the Smartvest at the start of the training.
– The batteries are too different in capacity. Make sure that three fully charged batteries are installed in the Smartvest at the start of the training.
Close the battery compartment cover (1). Slide the latch to the side to fully close the cover (2). Release the latch and make sure the tab of the latch engages the slot (3).
The batteries have now been changed and the training can be resumed.
After the training
Replicas
Another training later in the day
If another training session takes place on the same day, the replicas must be charged after the training session so that they have enough charge before the next training session begins. After the last scenario, instruct the participants to put the replicas back in the chest and connect all replicas to the charging cables. The replicas are charging when the red LED next to the charging cable connector is lit. Remove the charging cable going from the powerbank to the tracker and only plug in the powerbank into the charger.
Last training of the day
If this was the last training session of the day, the replicas should be turned off and stored in a locked room. After the last scenario, instruct the participants to turn off the replicas and place them back in the chest. The Glock can be turned off with the ON/OFF switch on the bottom of the charging unit. The Colt or Minimi can be turned off with the ON/OFF switch on the top of the charging and calibration unit.
Trackers of the replicas will in both cases automatically turn off.
Taking off the Smartvest
CAUTION
The Smartvest can be taken off by the participant, but it's easier – and less likely to damage cables and straps – when someone helps.
CAUTION
Never drop the headset. Never lay the Smartvest down anywhere, only hang it on the hanging rack.
Flip up the headset
To make it easier to take off the Smartvest, the three straps on the left and the three straps on the right in the side can be loosened (1). If necessary, the clips on the shoulders can also be loosened (2), so that the weight of the backpack box is shifted back to the back.
Detach the left and right foot strap: Detach the Velcro strap at the heel (1) and slide the foot strap off the foot (2). Fasten the Velcro parts to prevent parts from sticking together.
Loosen the left and right leg straps: First loosen the lower leg strap (1) and then release the upper leg strap (2). Fasten the Velcro parts to prevent parts from sticking together.
Detach the left and right arm straps: First loosen the grip strap (1) and slide the wrist strap off the hand (2). Now loosen the lower arm band (3)
and finally loosen the upper arm band (4). Fasten the Velcro parts to prevent parts from sticking together.
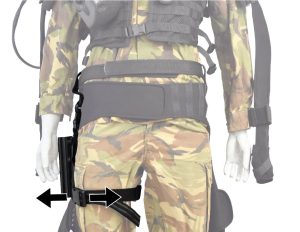
Loosen the leg strap of the holster.
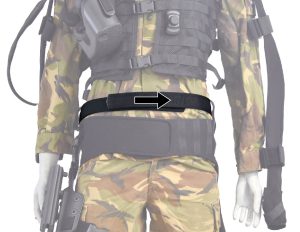
Loosen the belt.
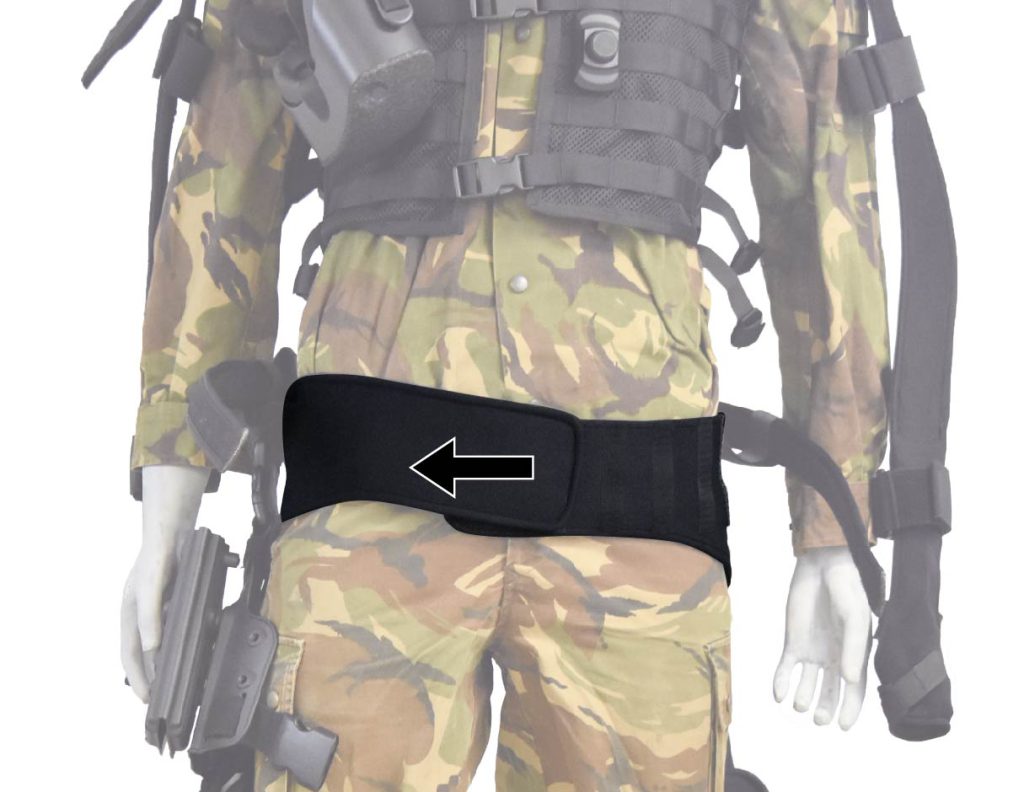
Loosen the hip strap.
Release the three clips on the front of the smart vest and take off the Smartvest.
Hang the Smartvest, on the hanging loop, on the single hook on the back of the hanging rack. Then take off the headset and hang it, on the headband, on the double hooks at the front of the suspension rack. Fasten the waist belt and tactical belt, close the three clips on the front of the Smartvest and connect the forearms on the front of the Smartvest together with the Velcro of the forearm sensor.
PAY ATTENTION
– Make sure all cables hang freely.
– Make sure that the arms and legs hang down neatly separately from each other.
– Close the three buckles on the front of the vest
– Close all Velcro parts.
– Connect the forearms at the front of the Smartvest together with the Velcro of the forearm sensor.
Shutting off the system
At the end of a training day, or if the system is left temporarily unattended between training sessions, the system should be turned off. To turn off the system, do the following:
System shutdown
On the EXCON in the SUIT home screen, click Shut down all and click Yes to turn off all Smartvests and the Spectator. If Delete user data is checked, all data under Start training → 1.Users will be deleted.
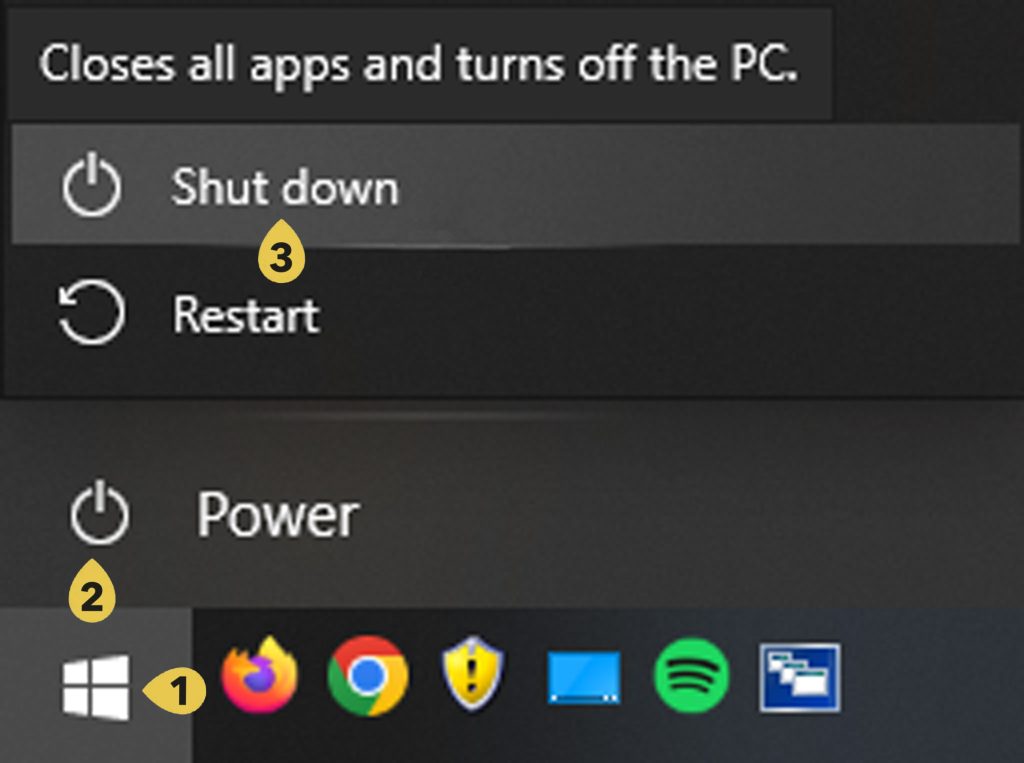
Close the EXCON by clicking Exit (2)(3) in the Windows Start menu (1). Wait for the computer to shut down completely.
Press the red ON/OFF switch on the back of the EXCON to O.
Disconnect the external hard drive from the EXCON (1). Place this together with the accompanying USB cable back in the top drawer of the EXCON (2) and then close the drawer (3).
PAY ATTENTION
Confidential training recordings (AAR) must be removed from the external hard drive before the system is put away. If the images cannot be deleted yet – because the training will be resumed at a later time – make sure that the external hard drive is kept in a safe place between training sessions.

Press the red ON/OFF switch on the back of the battery charger to O.
Verify that the spectator is closed down and, if necessary, close it by clicking Shut down (2)(3) in the Windows Start menu (1). Wait for the computer to shut down completely.
Check that the Spectator’s beamer is turned off and turn it off if necessary by pressing the ON/OFF button on the top of the beamer.
Check whether the speakers of the spectator are switched off and switch them off if necessary by pressing the ON/OFF button behind the beamer (1).
Press the red ON/OFF switch on the back of the spectator to O.
Remove the plugs of both cable reels from the wall socket.
Leaving system unattended
If the system has to be left temporarily unattended, keep the following points in mind:
System shutdown
If the system is left unattended, the system should be turned off. This is to prevent possible damage from lightning strikes or power surges. Shut down the system according to the instructions in System shutdown.
Storage replicas
If the system is left unattended, the replicas should be stored in a closed storage space.
Make sure the replicas are off and turn them off if necessary by pressing and holding the ON/OFF button for 2 seconds until all LEDs are off.
If not already done, remove the barrel from the Colt-C7 replicas. Pull out the lock knob (1) and slide the barrel off the replica Colt-C7 (2).

Place the barrel at the bottom of the box (1). Place the replica Colt-C7 in the case by inserting the pin of the replica into the hole on the side of the charging cables (2). Slide the sliding flask of the replica until the word KIST becomes visible in the circle on top of the stock (3). The replica Colt-C7 now fits exactly in the box (4).

If connected, disconnect the replicas from the charging cables.
Disconnect the power cables of the replica cases from the power cables of the replicas.
Disconnect the power cables from the trackers
Close the steel drawer in the lid (1) and place the insert over the replicas (2). Close the replica case.

Store the replica cases in a lockable room.
Hanging out Smartvests
Leave the Smartvests hanging from the hanging rack until the next training begins.
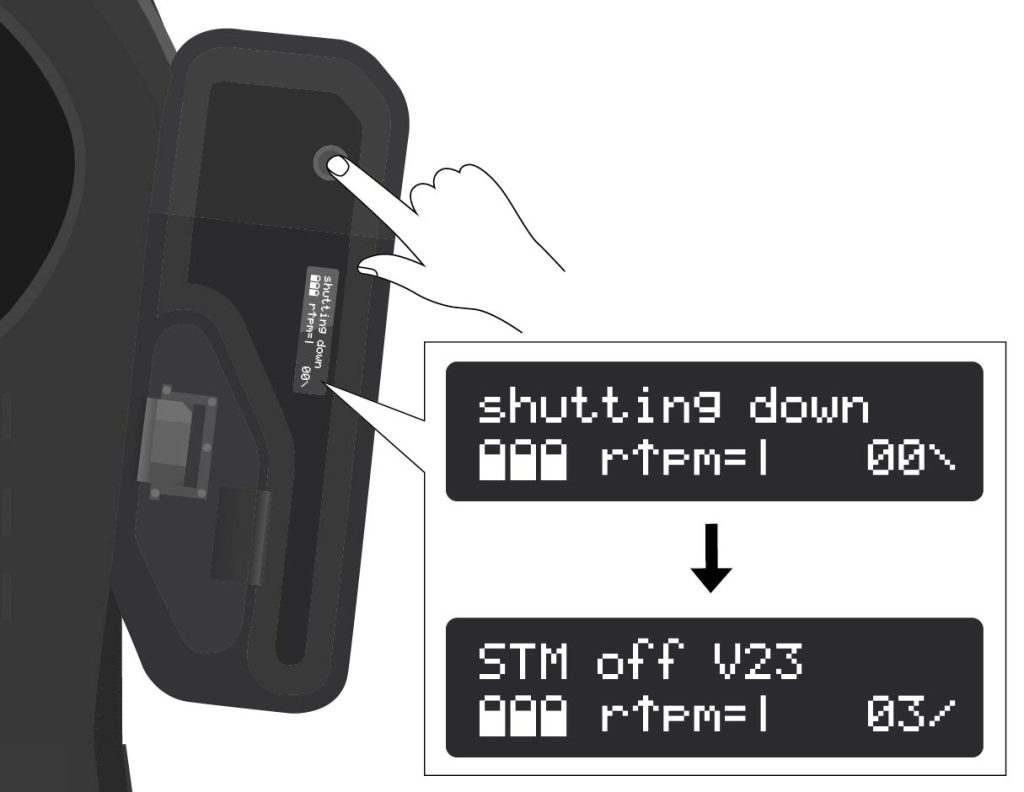
Check that all Smartvests are turned off and turn them off if necessary: press and hold the ON/OFF button on the Smartvest until the display shows Shutting Down.
WARNING
Wait for the System off message before proceeding to the next step.
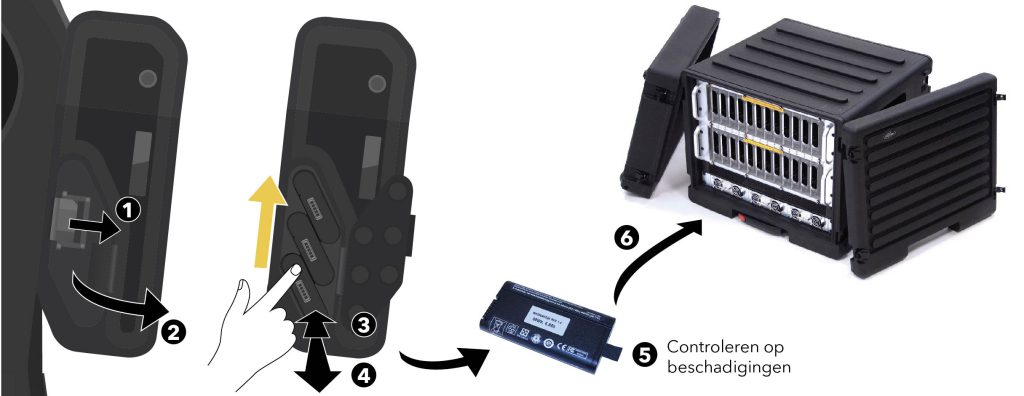
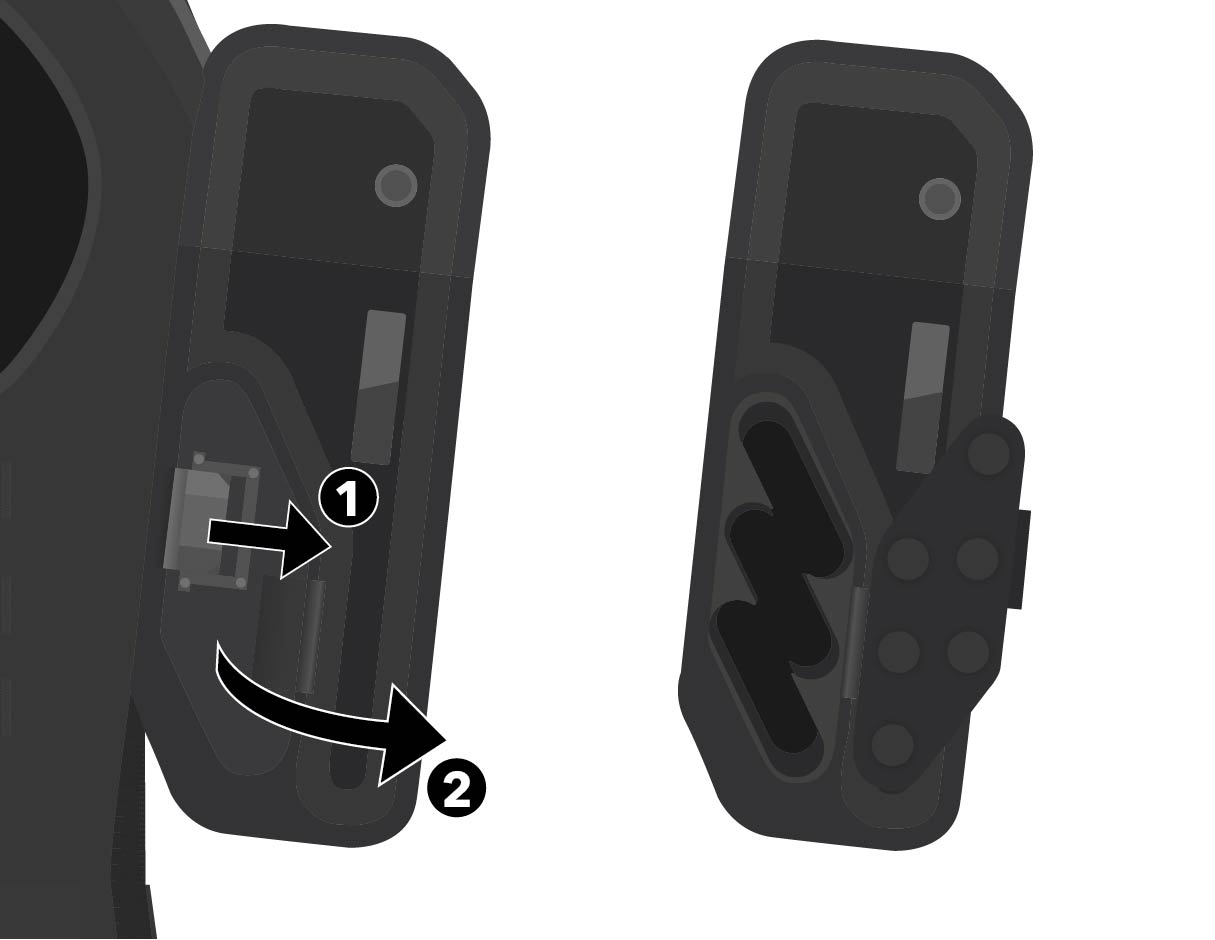
Take out the batteries of the Smartvests from bottom to top: Slide the latch to the side (1) to open the battery compartment cover (2). Press the battery to eject it (3). The battery can then be removed manually (4). Check the battery for damage (5) and place it – only if it is not damaged – in the battery charger (6).
WARNING
When batteries have been dropped or damaged, this must always be reported to the supplier RE-liON. These batteries should NOT be used anymore.
Close the battery compartment cover (1). Slide the latch to the side to fully close the cover (2). Release the latch and make sure the tab of the
latch engages the slot (3).
Make sure that the Smartvests hang correctly on the Mmartvest hanging rack. The Smartvest hangs with the hanging loop on the single hook on the back of the hanging rack and the headset hangs, on the headband, on the double hooks on the front of the hanging rack.
Make sure that: – all cables are hanging freely. – the three clips on the front of the vest are closed. – all Velcro parts are closed. – the legs are hanging neatly apart from each other. – the forearms at the front of the vest are connected to each other with the Velcro strap of the forearm sensor.
Maintenance
PAY ATTENTION
Remove the batteries before starting maintenance.
WARNING
It is not allowed to clean parts of SUIT with alcohol or chemical cleaning agents. Use clean water when cleaning. Cleaning products are not included.
WARNING
All maintenance not described here may only be performed by the manufacturer RE-liON.
Daily hygienic maintenance
Hygienic maintenance should be performed daily before and after a training.
Smartvests
- Spray the fabric of the Smartvests with myrazyme after each session.
- Clean the screens of the HMDs before each session with the supplied lens wipes.
- Clean the outside of the HMDs with a slightly damp cloth.
- Clean the earmuffs every day with a slightly damp cloth.
- Check the Smartvests for damaged or worn parts.
- If parts are damaged or worn, they must be replaced. Please contact RE-liON for this.
- Check if the silica gel bags in the lid of the Smartvest cases are full. If they are full, replace them. In any case, replace them every 6 to 8 weeks.
WARNING
After damp cleaning, immediately wipe the component dry with a dry cloth and do not spray liquids on the devices. If liquid gets into the components, it could cause fire, electric shock or malfunction.
Additional maintenance
The maintenance below can be performed if these parts have become dirty.
Cases
Clean and dry the outside of the cases with a dry cloth or brush.
If the cases are extremely dirty, they can also be cleaned with a wet cloth. In that case, make sure that all parts are removed from the case before cleaning with a damp cloth. After cleaning, dry both the outside and the inside of the case thoroughly before placing the parts back in the case.
WARNING
Keep the foam parts in the cases dry.
Smartvests
Clean and dry the smart vests with a dry cloth or brush.
If the Smartvests are extremely dirty, they can also be cleaned with a slightly damp cloth. Make sure the accessories are completely dry before packing them.
WARNING
After damp cleaning, immediately wipe the component dry with a dry cloth and do not spray liquids on the devices. If liquid gets into the components, it could cause fire, electric shock or malfunction.
Replicas
Clean the props with a dry towel
Tripods
Clean the tripods with a dry cloth or brush.
Cables
Clean the cables and connectors with a dry cloth and check that they are undamaged.